docker network create --subnet=172.20.0.0/16 mysql-network
docker network ls

mkdir -p /data/mysql-master/{conf,data,log}
mkdir -p /data/mysql-slave1/{conf,data,log}
mkdir -p /data/mysql-slave2/{conf,data,log}
创建日志
touch /data/mysql-{master,slave1,slave2}/log/mysqld-error.log
chown 999:999 /data/mysql-{master,slave1,slave2}/log/*
chmod 755 /data/mysql-{master,slave1,slave2}/log/*
touch /data/mysql-master/conf/my.cnf && chown 999:999 /data/mysql-master/conf/my.cnf
[mysqld]
server-id=1
pid-file= /var/run/mysqld/mysqld.pid
socket= /var/run/mysqld/mysqld.sock
datadir= /var/lib/mysql
log-error= /var/log/mysqld-error.log
slow-query-log-file= /var/log/slow-query.log
user=mysql
port=3306
lower_case_table_names=1
max_allowed_packet=400M
log_bin_trust_function_creators=1
max_connections=1000
explicit_defaults_for_timestamp=1
# 时区
default-time_zone = '+8:00'
sql_mode='STRICT_TRANS_TABLES,NO_ZERO_IN_DATE,NO_ZERO_DATE,ERROR_FOR_DIVISION_BY_ZERO,NO_AUTO_CREATE_USER,NO_ENGINE_SUBSTITUTION'

innodb_buffer_pool_size=1G
innodb_log_file_size=256M
innodb_flush_log_at_trx_commit=1
innodb_flush_method=O_DIRECT
innodb_autoinc_lock_mode=2
innodb_flush_log_at_trx_commit=0

#binlog
expire_logs_days=7
log-bin=mysql-bin
binlog-format=ROW

#指定默认引擎
disabled_storage_engines=MyISAM,BLACKHOLE,FEDERATED,CSV,ARCHIVE
default_storage_engine=innodb

symbolic-links=0
init_connect='SET collation_connection = utf8_unicode_ci'
init_connect='SET NAMES utf8'
character-set-server=utf8
collation-server=utf8_unicode_ci
skip-character-set-client-handshake

[client]
default-character-set=utf8

[mysql]
default-character-set=utf8
docker run --name mysql-master --net mysql-network --ip 172.20.0.10 \
-v /data/mysql-master/conf/my.cnf:/etc/my.cnf \
-v /data/mysql-master/log:/var/log/ \
-v /data/mysql-master/data:/var/lib/mysql \
-e TZ="Asia/Shanghai" \
-e MYSQL_ROOT_PASSWORD=CWCcwy12 \
-d mysql:5.7.39
touch /data/mysql-slave1/conf/my.cnf && chown 999:999 /data/mysql-slave1/conf/my.cnf
vim /data/mysql-slave1/conf/my.cnf
[mysqld]
server-id=2
pid-file= /var/run/mysqld/mysqld.pid
socket= /var/run/mysqld/mysqld.sock
datadir= /var/lib/mysql
log-error= /var/log/mysqld-error.log
slow-query-log-file= /var/log/slow-query.log
user=mysql
port=3306
lower_case_table_names=1
max_allowed_packet=400M
log_bin_trust_function_creators=1
max_connections=1000
explicit_defaults_for_timestamp=1
# 时区
default-time_zone = '+8:00'
sql_mode='STRICT_TRANS_TABLES,NO_ZERO_IN_DATE,NO_ZERO_DATE,ERROR_FOR_DIVISION_BY_ZERO,NO_AUTO_CREATE_USER,NO_ENGINE_SUBSTITUTION'

innodb_buffer_pool_size=1G
innodb_log_file_size=256M
innodb_flush_log_at_trx_commit=1
innodb_flush_method=O_DIRECT
innodb_autoinc_lock_mode=2
innodb_flush_log_at_trx_commit=0

#从库设置为只读,不设置的话,proxysql会设置为可写
read_only=1

#binlog
expire_logs_days=7
log-bin=mysql-bin
binlog-format=ROW

#指定默认引擎
disabled_storage_engines=MyISAM,BLACKHOLE,FEDERATED,CSV,ARCHIVE
default_storage_engine=innodb

symbolic-links=0
init_connect='SET collation_connection = utf8_unicode_ci'
init_connect='SET NAMES utf8'
character-set-server=utf8
collation-server=utf8_unicode_ci
skip-character-set-client-handshake

[client]
default-character-set=utf8

[mysql]
default-character-set=utf8
docker run --name mysql-slave1 --net mysql-network --ip 172.20.0.11 \
-v /data/mysql-slave1/conf/my.cnf:/etc/my.cnf \
-v /data/mysql-slave1/log:/var/log/ \
-v /data/mysql-slave1/data:/var/lib/mysql \
-e TZ="Asia/Shanghai" \
-e MYSQL_ROOT_PASSWORD=CWCcwy12 \
-d mysql:5.7.39
touch /data/mysql-slave2/conf/my.cnf && chown 999:999 /data/mysql-slave2/conf/my.cnf
vim /data/mysql-slave2/conf/my.cnf
[mysqld]
server-id=3
pid-file= /var/run/mysqld/mysqld.pid
socket= /var/run/mysqld/mysqld.sock
datadir= /var/lib/mysql
log-error= /var/log/mysqld-error.log
slow-query-log-file= /var/log/slow-query.log
user=mysql
port=3306
lower_case_table_names=1
max_allowed_packet=400M
log_bin_trust_function_creators=1
max_connections=1000
explicit_defaults_for_timestamp=1
# 时区
default-time_zone = '+8:00'
sql_mode='STRICT_TRANS_TABLES,NO_ZERO_IN_DATE,NO_ZERO_DATE,ERROR_FOR_DIVISION_BY_ZERO,NO_AUTO_CREATE_USER,NO_ENGINE_SUBSTITUTION'

innodb_buffer_pool_size=1G
innodb_log_file_size=256M
innodb_flush_log_at_trx_commit=1
innodb_flush_method=O_DIRECT
innodb_autoinc_lock_mode=2
innodb_flush_log_at_trx_commit=0

#从库设置为只读,不设置的话,proxysql会设置为可写
read_only=1

#binlog
expire_logs_days=7
log-bin=mysql-bin
binlog-format=ROW

#指定默认引擎
disabled_storage_engines=MyISAM,BLACKHOLE,FEDERATED,CSV,ARCHIVE
default_storage_engine=innodb

symbolic-links=0
init_connect='SET collation_connection = utf8_unicode_ci'
init_connect='SET NAMES utf8'
character-set-server=utf8
collation-server=utf8_unicode_ci
skip-character-set-client-handshake

[client]
default-character-set=utf8

[mysql]
default-character-set=utf8
docker run --name mysql-slave2 --net mysql-network --ip 172.20.0.12 \
-v /data/mysql-slave2/conf/my.cnf:/etc/my.cnf \
-v /data/mysql-slave2/log:/var/log/ \
-v /data/mysql-slave2/data:/var/lib/mysql \
-e TZ="Asia/Shanghai" \
-e MYSQL_ROOT_PASSWORD=CWCcwy12 \
-d mysql:5.7.39

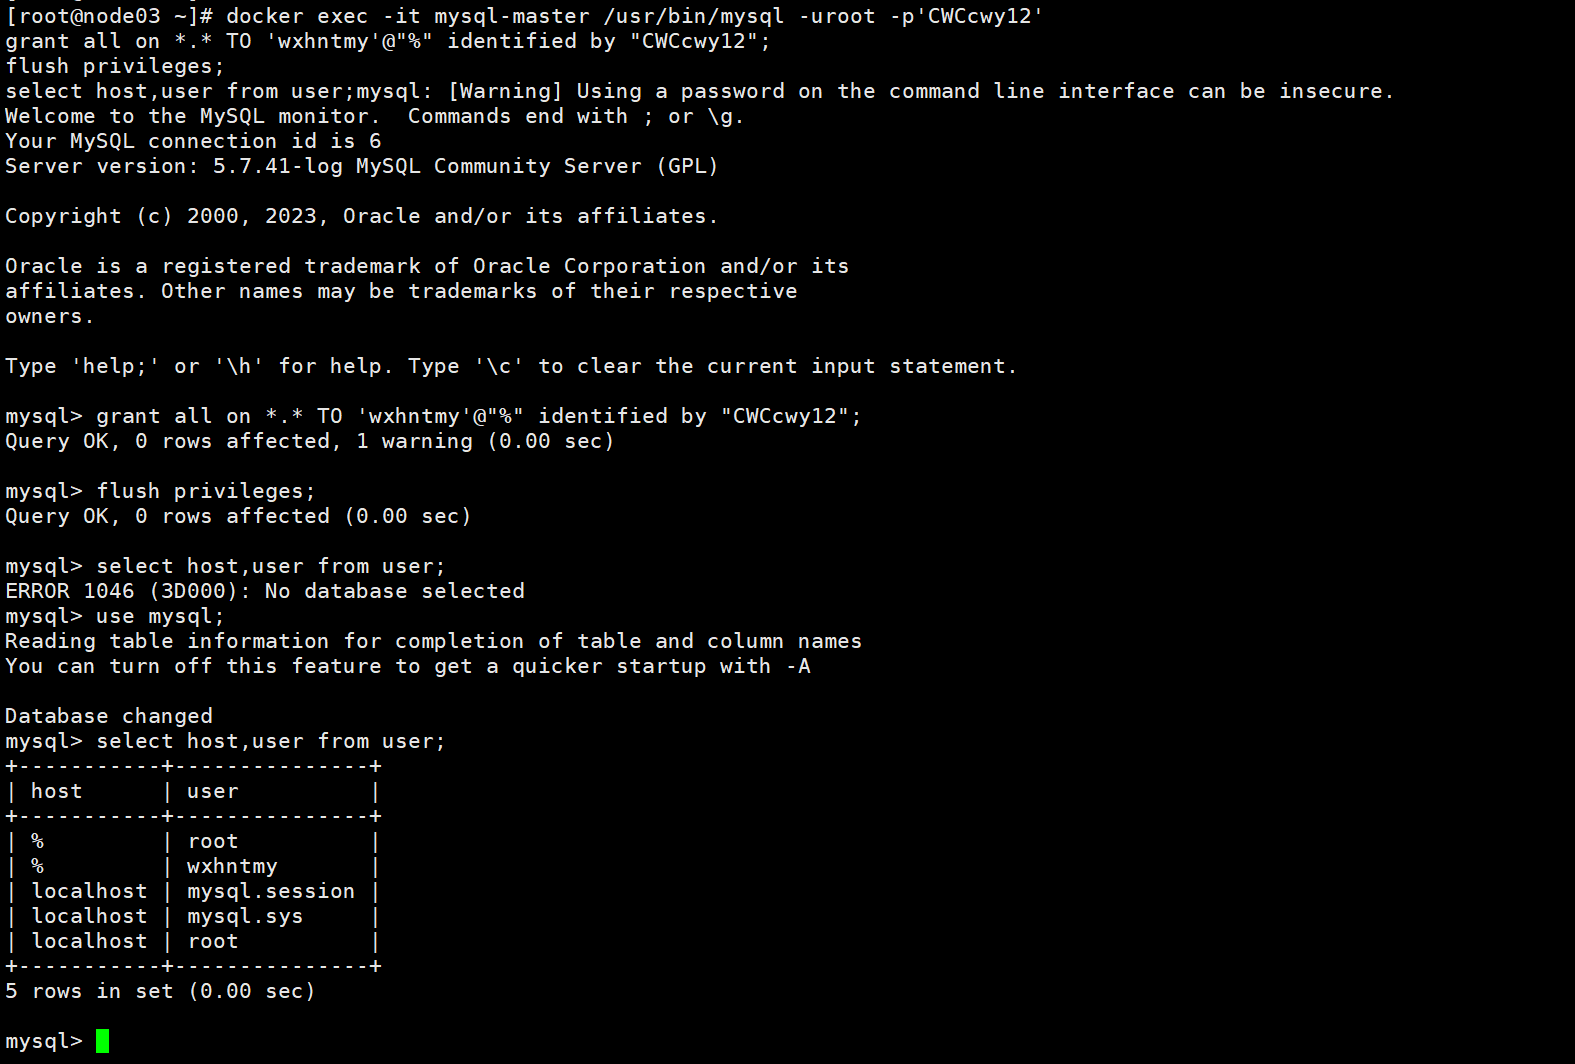
docker exec -it mysql-master /usr/bin/mysql -uroot -p'CWCcwy12'
# 创建用于主从同步的用户
grant all on *.* TO 'wxhntmy'@"%" identified by "CWCcwy12";
flush privileges;
use mysql;
select host,user from user;
show master status\G

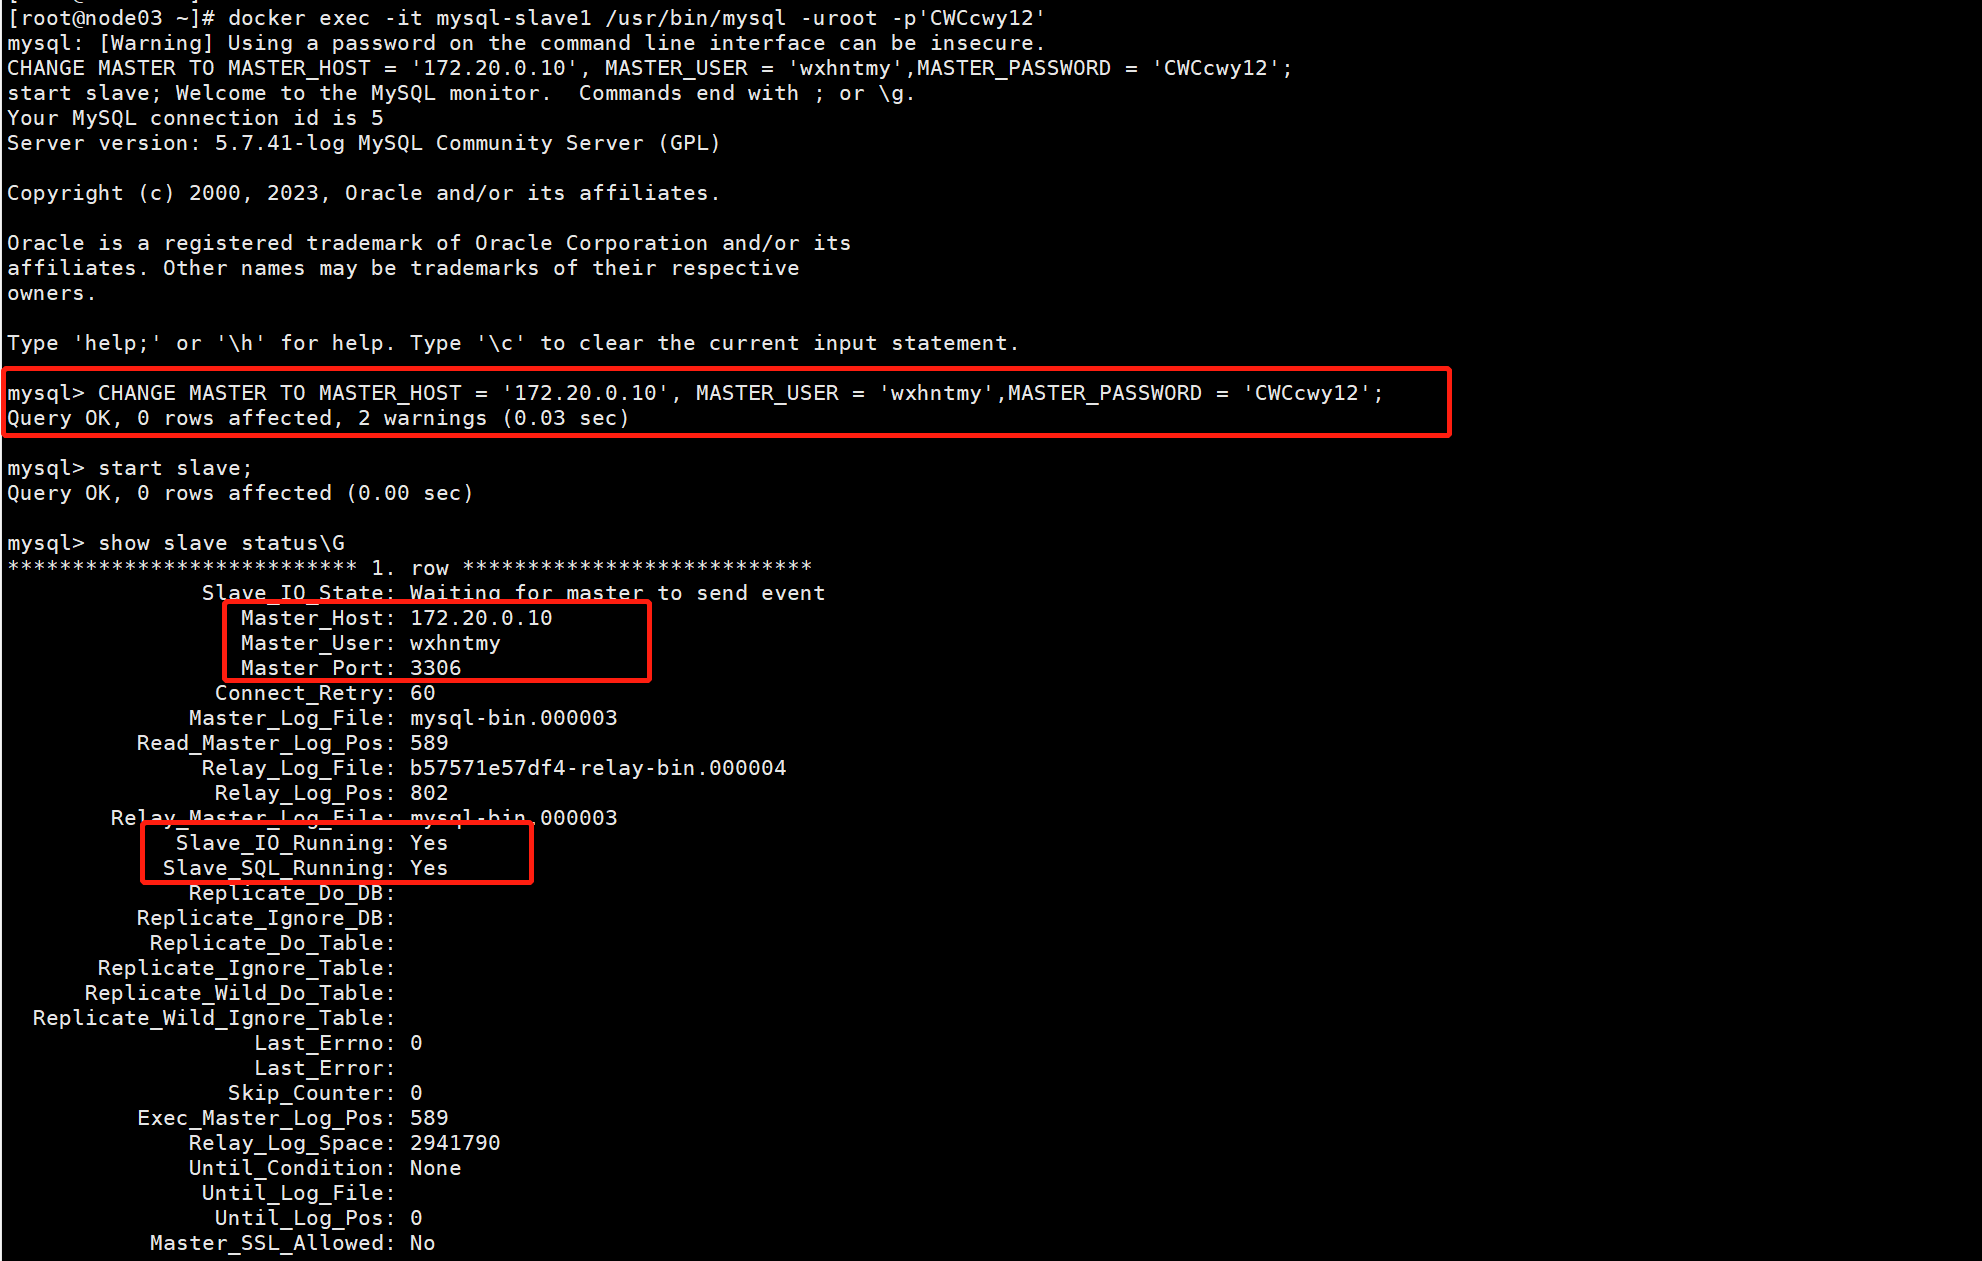
docker exec -it mysql-slave1 /usr/bin/mysql -uroot -p'CWCcwy12'
CHANGE MASTER TO MASTER_HOST = '172.20.0.10', MASTER_USER = 'wxhntmy',MASTER_PASSWORD = 'CWCcwy12';
start slave;
show slave status\G
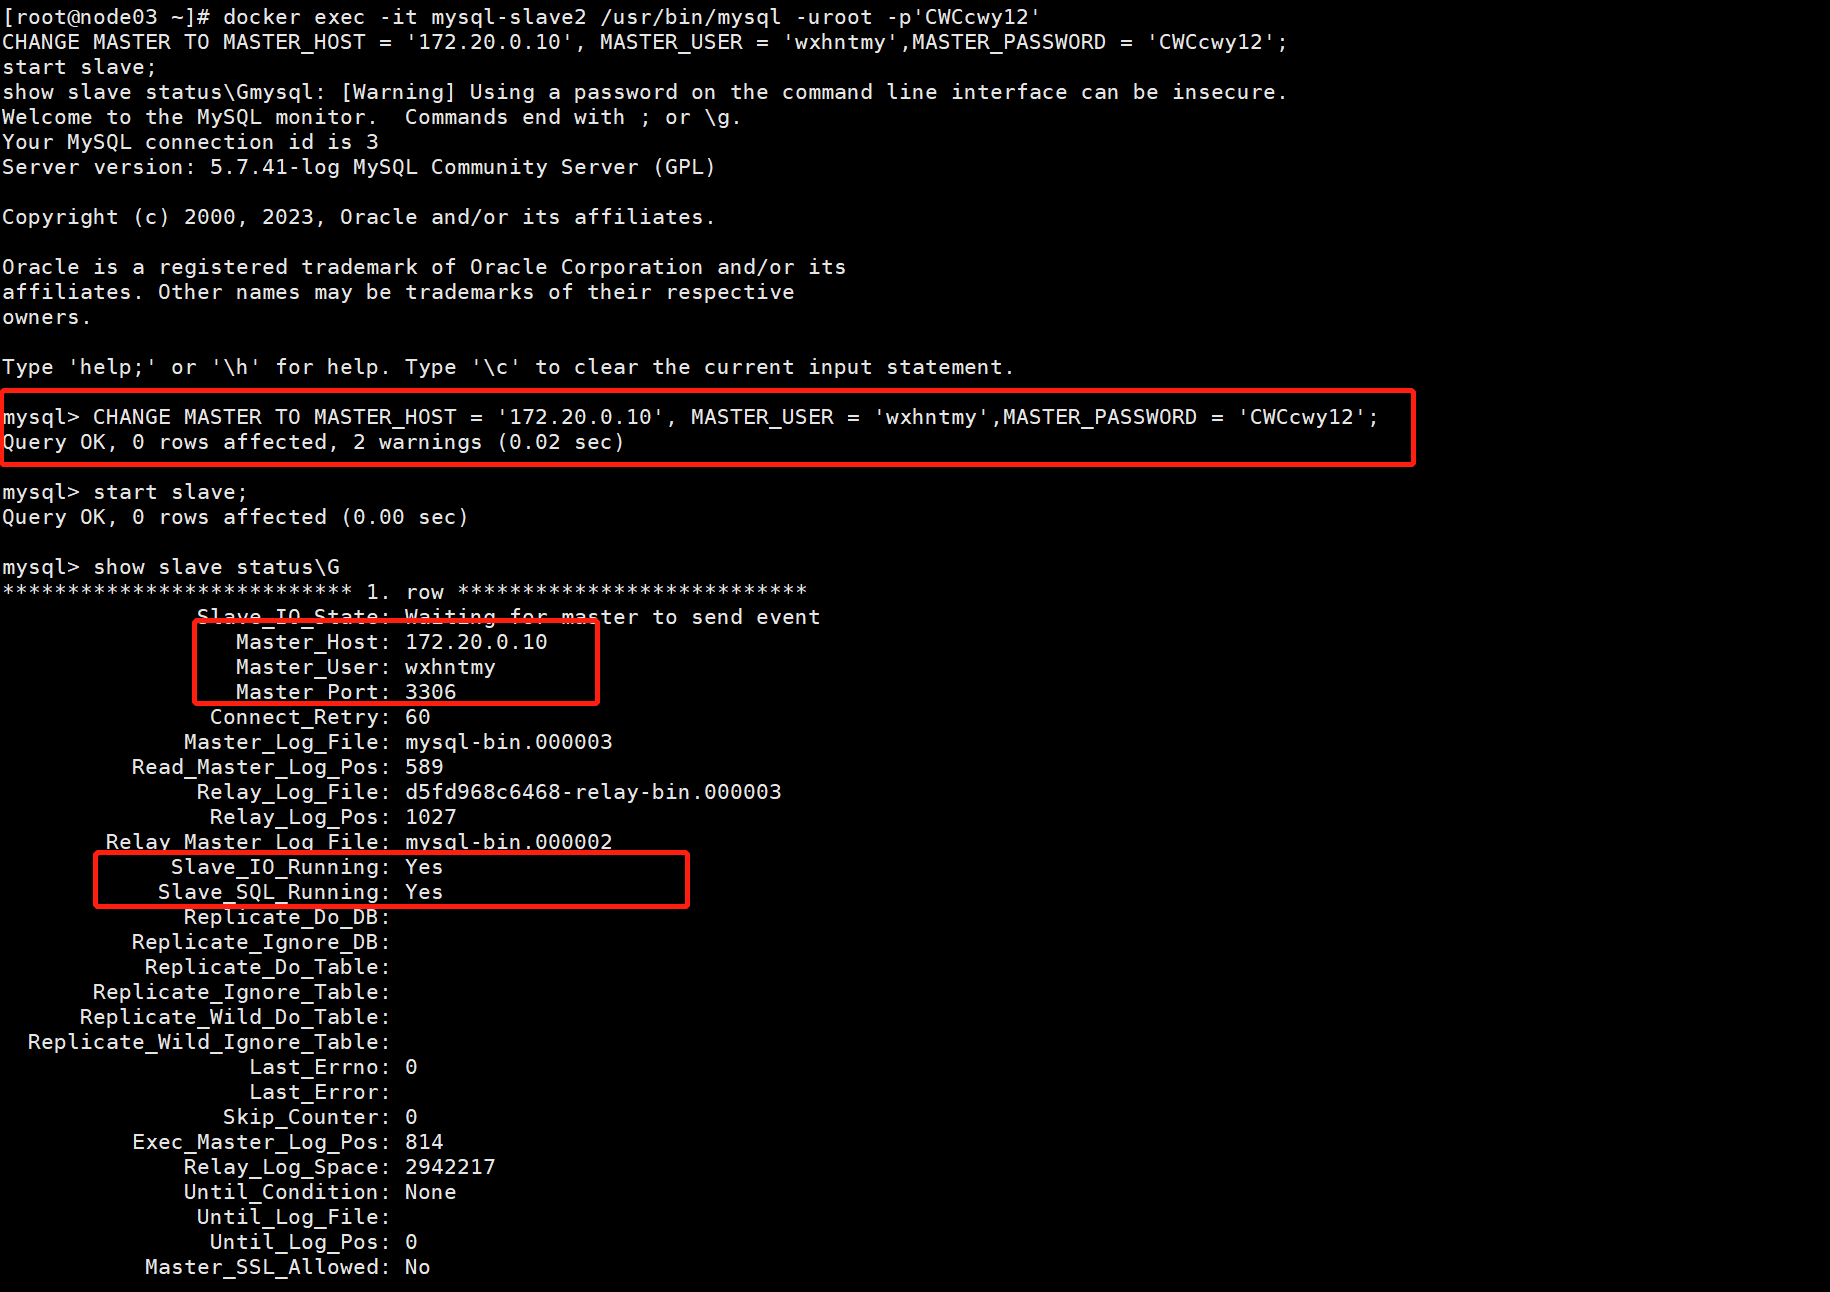
docker exec -it mysql-slave2 /usr/bin/mysql -uroot -p'CWCcwy12'
CHANGE MASTER TO MASTER_HOST = '172.20.0.10', MASTER_USER = 'wxhntmy',MASTER_PASSWORD = 'CWCcwy12';
start slave;
show slave status\G
mkdir -p /data/proxysql/{conf,data}
touch /data/proxysql/conf/proxysql.cnf && vim /data/proxysql/conf/proxysql.cnf
#file proxysql.cfg

########################################################################################
# This config file is parsed using libconfig , and its grammar is described in:
# http://www.hyperrealm.com/libconfig/libconfig_manual.html#Configuration-File-Grammar
# Grammar is also copied at the end of this file
########################################################################################

########################################################################################
# IMPORTANT INFORMATION REGARDING THIS CONFIGURATION FILE:
########################################################################################
# On startup, ProxySQL reads its config file (if present) to determine its datadir.
# What happens next depends on if the database file (disk) is present in the defined
# datadir (i.e. "/var/lib/proxysql/proxysql.db").
#
# If the database file is found, ProxySQL initializes its in-memory configuration from
# the persisted on-disk database. So, disk configuration gets loaded into memory and
# then propagated towards the runtime configuration.
#
# If the database file is not found and a config file exists, the config file is parsed
# and its content is loaded into the in-memory database, to then be both saved on-disk
# database and loaded at runtime.
#
# IMPORTANT: If a database file is found, the config file is NOT parsed. In this case
#            ProxySQL initializes its in-memory configuration from the persisted on-disk
#            database ONLY. In other words, the configuration found in the proxysql.cnf
#            file is only used to initial the on-disk database read on the first startup.
#
# In order to FORCE a re-initialise of the on-disk database from the configuration file
# the ProxySQL service should be started with "systemctl start proxysql-initial".
#
########################################################################################

datadir="/var/lib/proxysql"
errorlog="/var/lib/proxysql/proxysql.log"

admin_variables=
{
  #配置可以外网访问的管理员
    admin_credentials="wxhntmy:CWCcwy12"
#    mysql_ifaces="127.0.0.1:6032;/tmp/proxysql_admin.sock"
    mysql_ifaces="0.0.0.0:6032"
#    refresh_interval=2000
#    debug=true
}

mysql_variables=
{
    threads=4
    max_connections=2048
    default_query_delay=0
    default_query_timeout=36000000
    have_compress=true
    poll_timeout=2000
#    interfaces="0.0.0.0:6033;/tmp/proxysql.sock"
    interfaces="0.0.0.0:6033"
    default_schema="information_schema"
    stacksize=1048576
 #数据库版本号
    server_version="5.7.39"
    connect_timeout_server=3000
# make sure to configure monitor username and password
# https://github.com/sysown/proxysql/wiki/Global-variables#mysql-monitor_username-mysql-monitor_password

  #监控健康状态的用户
  monitor_username="monitor"
    monitor_password="CWCcwy12"
    monitor_history=600000
    monitor_connect_interval=60000
    monitor_ping_interval=10000
    monitor_read_only_interval=1500
    monitor_read_only_timeout=500
    ping_interval_server_msec=120000
    ping_timeout_server=500
    commands_stats=true
    sessions_sort=true
    connect_retries_on_failure=10
 # 激活时(2.0.6版本中的默认设置),如果SET语句用于多语句命令,或者SET语句解析不成功,
 # 则多路复用和查询路由都将被禁用。客户端将保持绑定到单个后端连接。
 # ProxySQL不理解的任何SET语句都将禁用多路复用和路由。
  set_query_lock_on_hostgroup=0
}


# defines all the MySQL servers
#MySQL节点,这里host是根据mysql的无头服务
mysql_servers =
(
  {
    address= "172.20.0.10",
    port=3306,
    hostgroup=10,
    max_connections=100
  },
  {
    address= "172.20.0.11",
    port=3306,
    hostgroup=20,
    max_connections=100
  },
  {
    address= "172.20.0.12",
    port=3306,
    hostgroup=20,
    max_connections=100
  }
#    {
#        address = "127.0.0.1" # no default, required . If port is 0 , address is interpred as a Unix Socket Domain
#        port = 3306           # no default, required . If port is 0 , address is interpred as a Unix Socket Domain
#        hostgroup = 0           # no default, required
#        status = "ONLINE"     # default: ONLINE
#        weight = 1            # default: 1
#        compression = 0       # default: 0
#   max_replication_lag = 10  # default 0 . If greater than 0 and replication lag passes such threshold, the server is shunned
#    },
#    {
#        address = "/var/lib/mysql/mysql.sock"
#        port = 0
#        hostgroup = 0
#    },
#    {
#        address="127.0.0.1"
#        port=21891
#        hostgroup=0
#        max_connections=200
#    },
#    { address="127.0.0.2" , port=3306 , hostgroup=0, max_connections=5 },
#    { address="127.0.0.1" , port=21892 , hostgroup=1 },
#    { address="127.0.0.1" , port=21893 , hostgroup=1 }
#    { address="127.0.0.2" , port=3306 , hostgroup=1 },
#    { address="127.0.0.3" , port=3306 , hostgroup=1 },
#    { address="127.0.0.4" , port=3306 , hostgroup=1 },
#    { address="/var/lib/mysql/mysql.sock" , port=0 , hostgroup=1 }
)


# defines all the MySQL users
#MySQL的用户
mysql_users:
(
  {
    username = "proxysql" ,
    password = "CWCcwy12" ,
    default_hostgroup = 10,
    transaction_persistent = 0,
    active = 1
  }
#    {
#        username = "username" # no default , required
#        password = "password" # default: ''
#        default_hostgroup = 0 # default: 0
#        active = 1            # default: 1
#    },
#    {
#        username = "root"
#        password = ""
#        default_hostgroup = 0
#        max_connections=1000
#        default_schema="test"
#        active = 1
#    },
#    { username = "user1" , password = "password" , default_hostgroup = 0 , active = 0 }
)


#defines MySQL Query Rules
mysql_query_rules:
(
#select * from tb for update 这样的语句是会修改数据的,
# 所以需要单独定义,将它路由至 hostgroup_id=10 的组 (写组)
    {
         rule_id=1
         active=1
         match_digest= "(?i)^(?!SELECT).*$"
         destination_hostgroup=10
         apply=1
     },
# 将 select 查询语句全部路由至 hostgroup_id=20 的组 (读组)
#其他没有被规则匹配到的组将会被路由至用户默认的组 (mysql_users 表中的 default_hostgroup)
     {
         rule_id=2
         active=1
         match_digest= "(?i)^SELECT.*$"
         destination_hostgroup=20
         apply=1
     }
#    {
#        rule_id=1
#        active=1
#        match_pattern="^SELECT .* FOR UPDATE$"
#        destination_hostgroup=0
#        apply=1
#    },
#    {
#        rule_id=2
#        active=1
#        match_pattern="^SELECT"
#        destination_hostgroup=1
#        apply=1
#    }
)

scheduler=
(
#  {
#    id=1
#    active=0
#    interval_ms=10000
#    filename="/var/lib/proxysql/proxysql_galera_checker.sh"
#    arg1="0"
#    arg2="0"
#    arg3="0"
#    arg4="1"
#    arg5="/var/lib/proxysql/proxysql_galera_checker.log"
#  }
)


mysql_replication_hostgroups=
(
       {
                writer_hostgroup=10
                reader_hostgroup=20
                comment="proxysql-cluster"
       }
#       {
#                writer_hostgroup=50
#                reader_hostgroup=60
#                comment="test repl 2"
#        }
)


proxysql_servers =
(
#  {
#    hostname = "172.20.0.13" ,
#    port = 6032,
#    weight = 1
#  },
#  {
#    hostname = "172.20.0.14" ,
#    port = 6032,
#    weight = 1
#  }
)


# http://www.hyperrealm.com/libconfig/libconfig_manual.html#Configuration-File-Grammar
#
# Below is the BNF grammar for configuration files. Comments and include directives are not part of the grammar, so they are not included here.
#
# configuration = setting-list | empty
#
# setting-list = setting | setting-list setting
#
# setting = name (":" | "=") value (";" | "," | empty)
#
# value = scalar-value | array | list | group
#
# value-list = value | value-list "," value
#
# scalar-value = boolean | integer | integer64 | hex | hex64 | float
#                | string
#
# scalar-value-list = scalar-value | scalar-value-list "," scalar-value
#
# array = "[" (scalar-value-list | empty) "]"
#
# list = "(" (value-list | empty) ")"
#
# group = "{" (setting-list | empty) "}"
#
# empty =
docker run --name proxysql -p 6032:6032 -p 6033:6033 -p 6070:6070 -d \
--net mysql-network --ip 172.20.0.13 \
-v /data/proxysql/conf/proxysql.cnf:/etc/proxysql.cnf \
-v /data/proxysql/data:/var/lib/proxysql/ \
proxysql/proxysql:latest
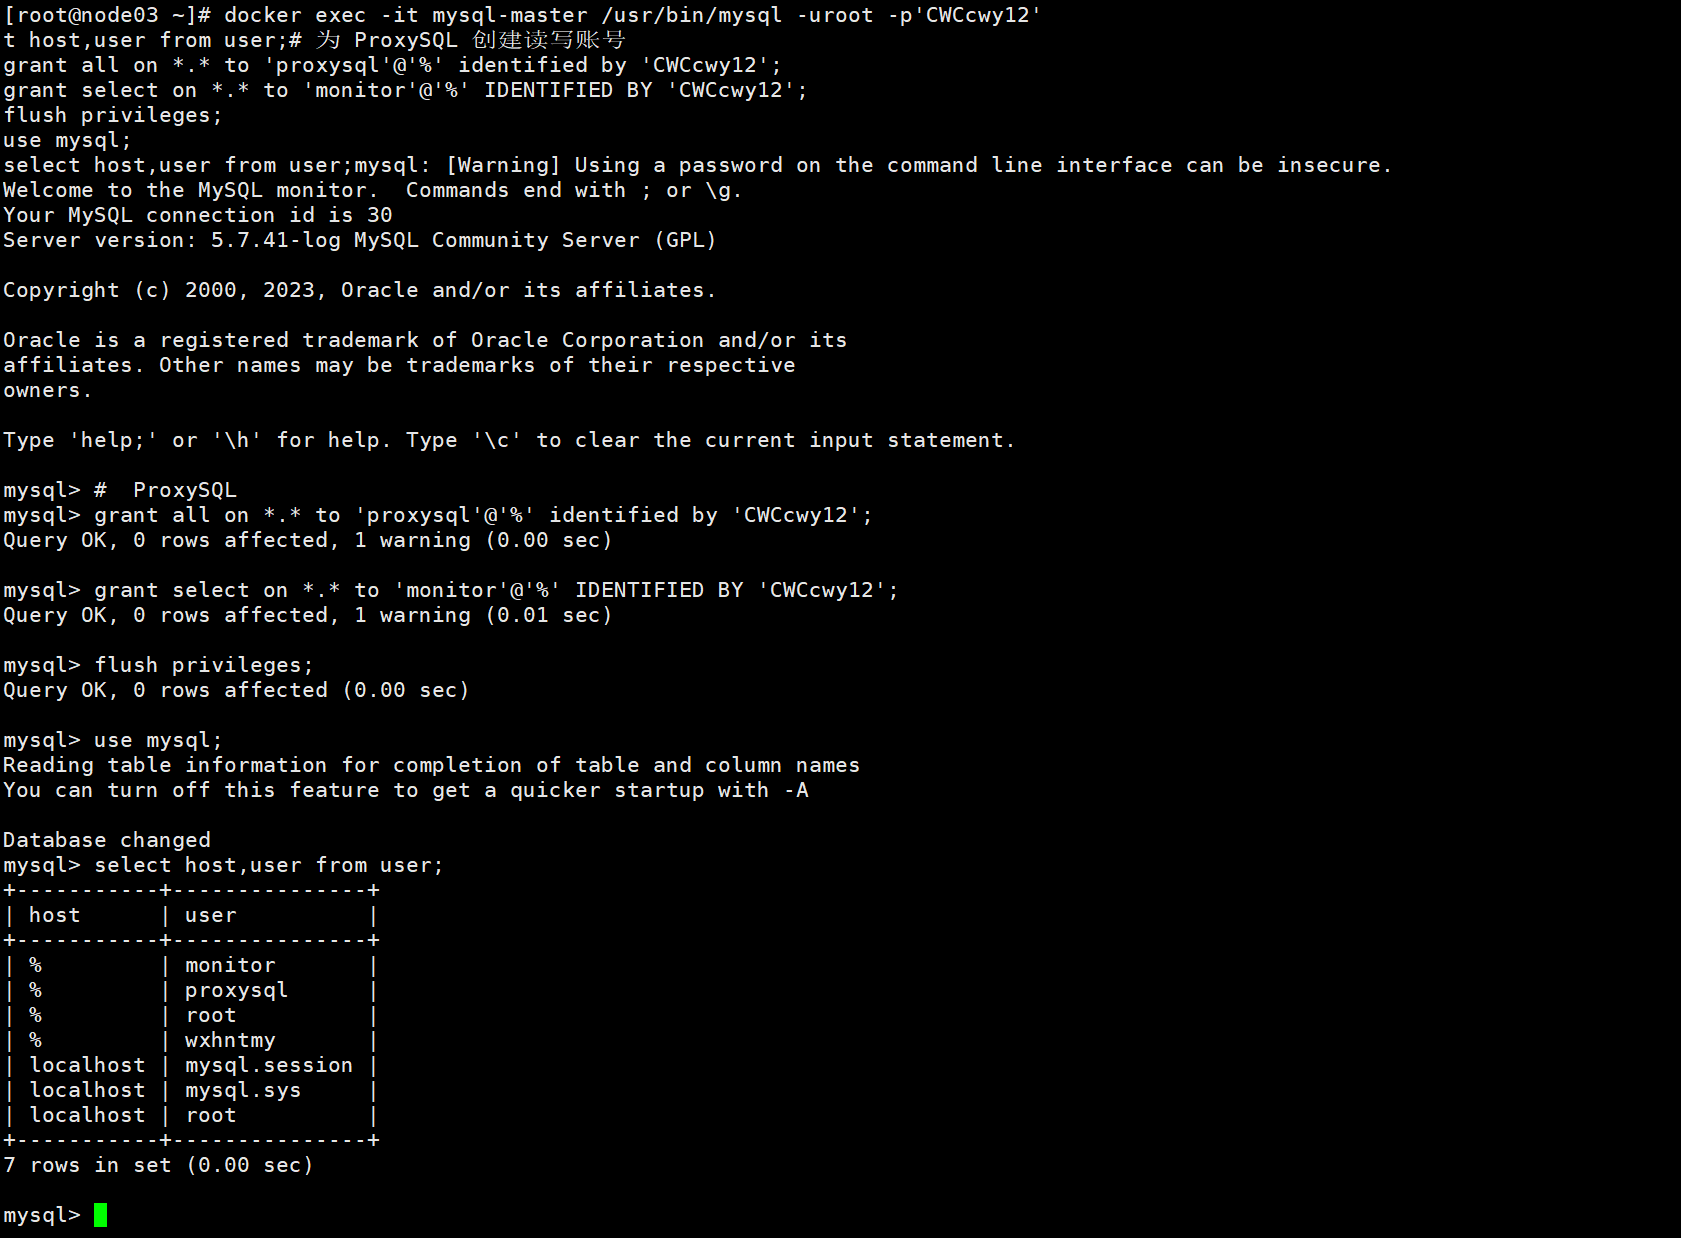
docker exec -it mysql-master /usr/bin/mysql -uroot -p'CWCcwy12'
# 为 ProxySQL 创建读写账号
grant all on *.* to 'proxysql'@'%' identified by 'CWCcwy12';
grant select on *.* to 'monitor'@'%' IDENTIFIED BY 'CWCcwy12';
flush privileges;
use mysql;
select host,user from user;
# 此处要用proxysql.cnf配置的管理员
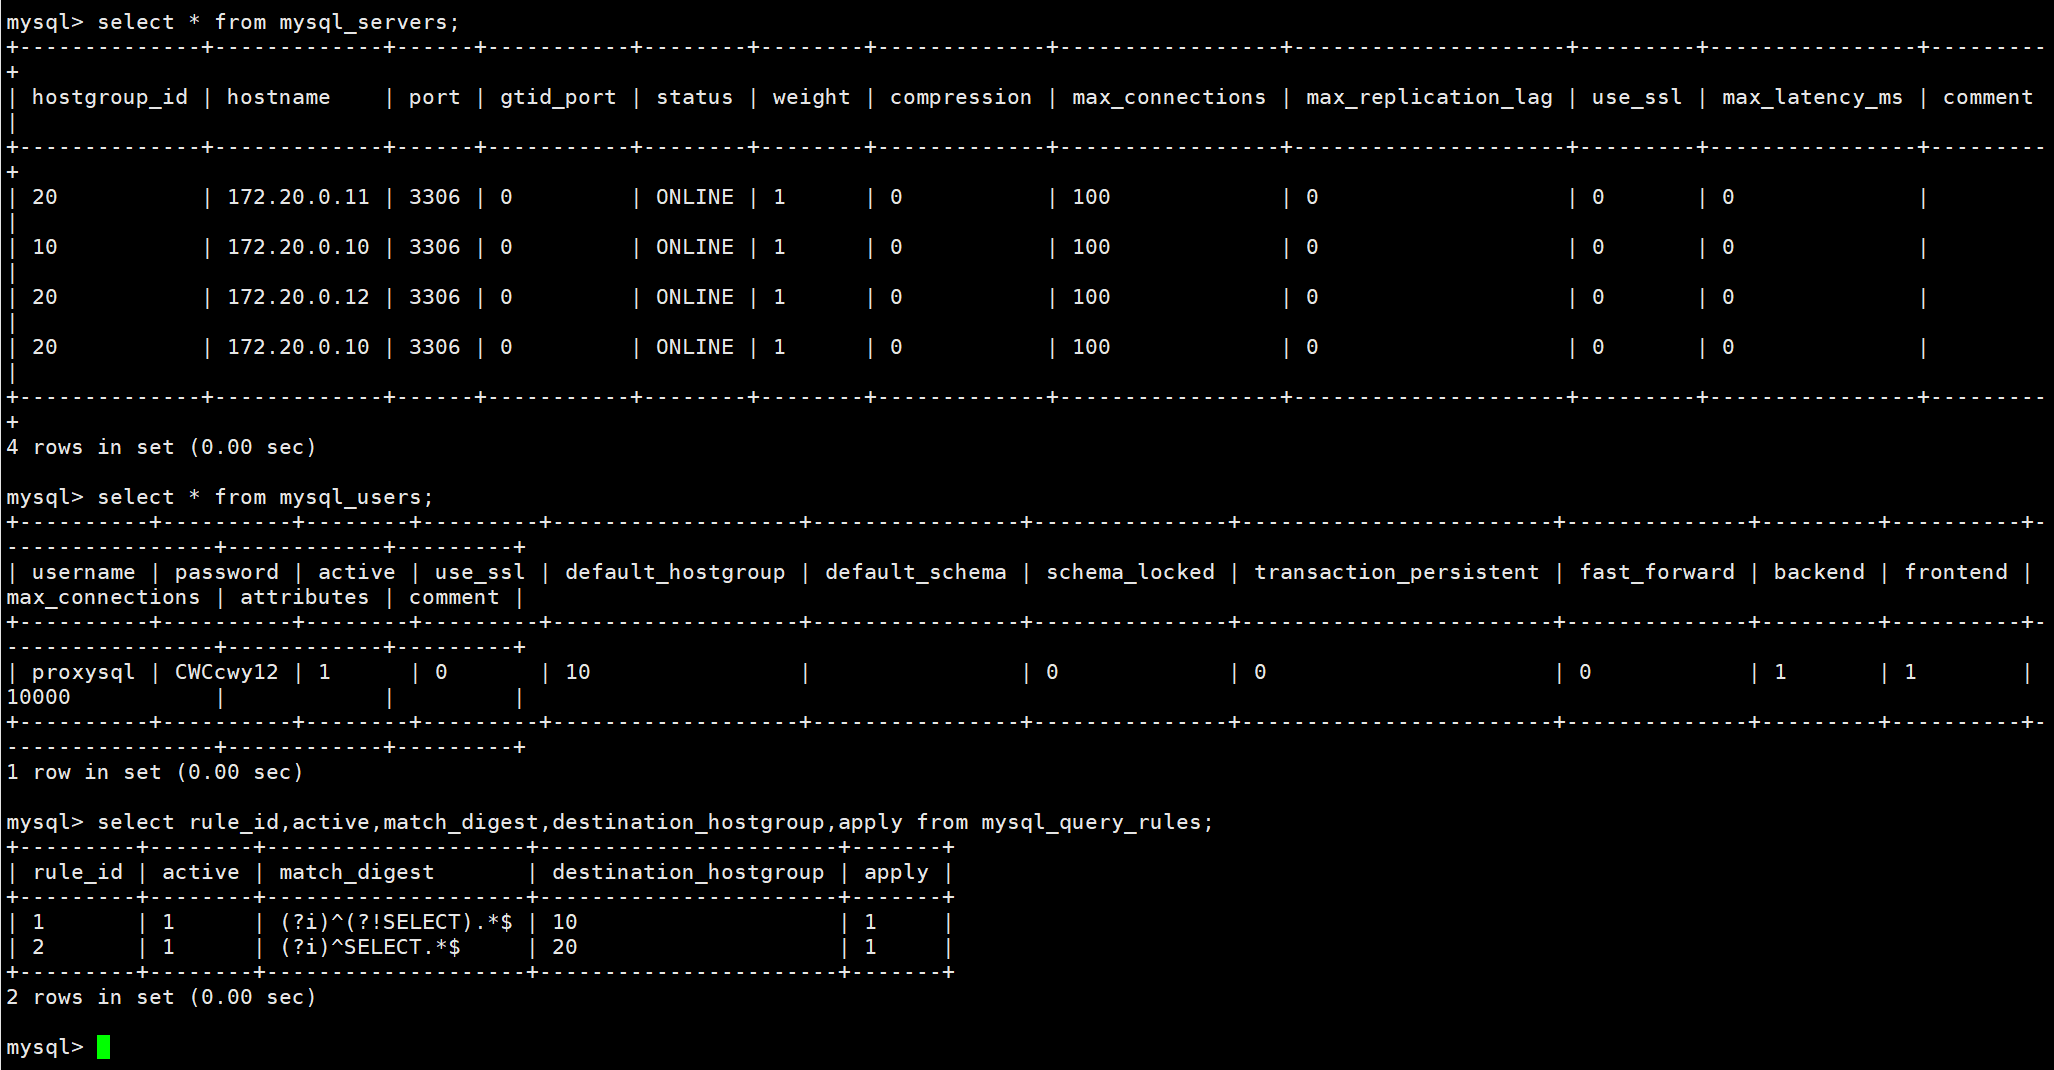
docker exec -it mysql-master /usr/bin/mysql -uwxhntmy -p'CWCcwy12' -P6032 -h172.20.0.13

# MySQL服务
select * from mysql_servers;
# mysql用户
select * from mysql_users;
# 查看路由规则
select rule_id,active,match_digest,destination_hostgroup,apply from mysql_query_rules;
登录 6033 SQL 运行端运行 SQL
# 此处要用mysql的用户
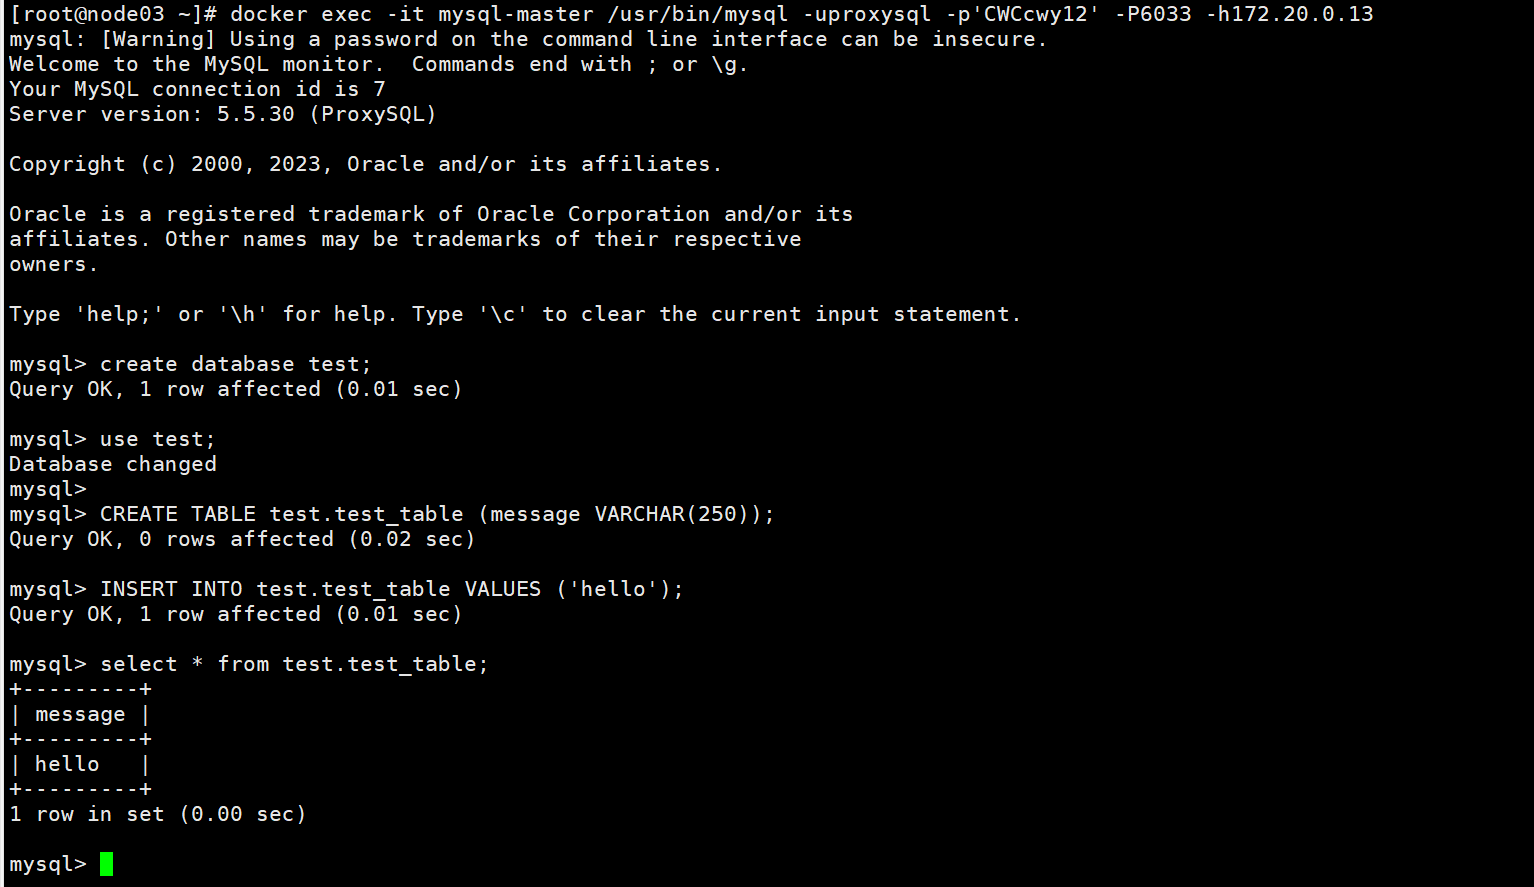
docker exec -it mysql-master /usr/bin/mysql -uproxysql -p'CWCcwy12' -P6033 -h172.20.0.13
验证读写分离
create database test;
use test;
CREATE TABLE test.test_table (message VARCHAR(250));
INSERT INTO test.test_table VALUES ('hello');
select * from test.test_table;
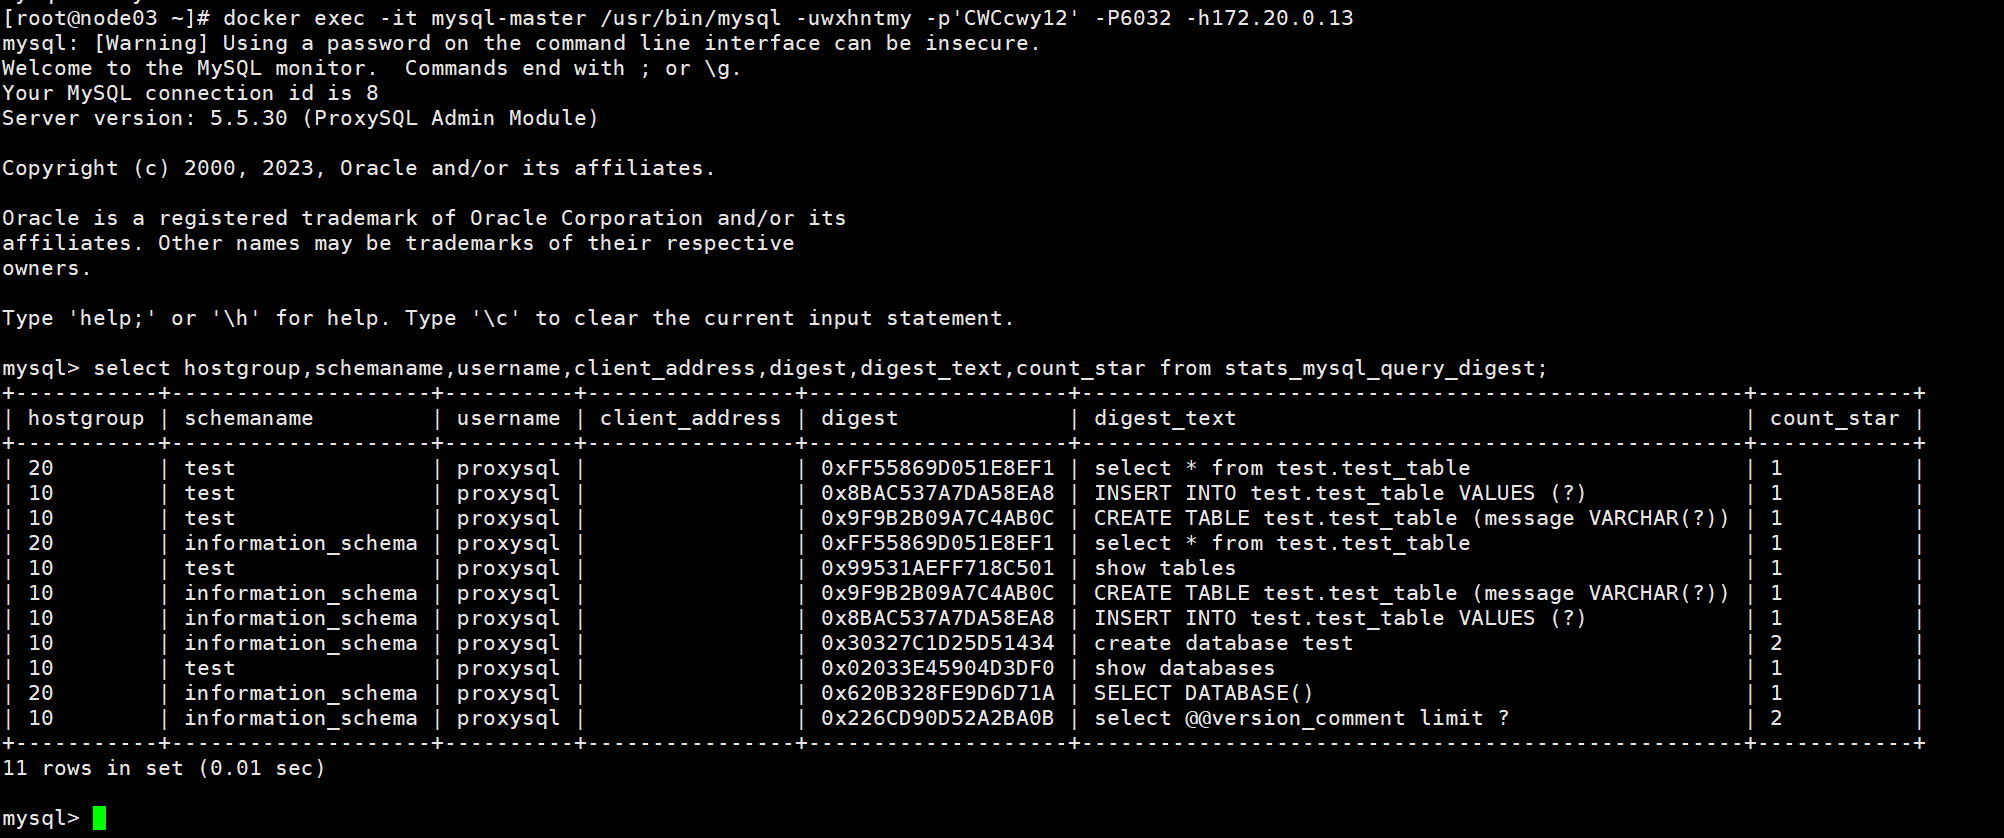
登录 6032 管理端查看审计日志
# 此处要用proxysql.cnf配置的管理员
docker exec -it mysql-master /usr/bin/mysql -uwxhntmy -p'CWCcwy12' -P6032 -h172.20.0.13
# 查看SQL运行状况
select hostgroup,schemaname,username,client_address,digest,digest_text,count_star from stats_mysql_query_digest;
