在此模式中,有三个 WSO2 ESB 节点:1 个节点充当管理节点,2 个节点充当工作节点,以实现高可用性和服务请求。 在此模式中,我们允许通过外部负载均衡器访问管理控制台。 此外,服务请求通过此负载均衡器定向到工作节点。 下图描述了此集群部署场景将遵循的示例模式。
以此模式配置WSO2集群配置时,请在配置文件 axis2.xml 中使用特定 IP 地址而不是 localhost 或主机名。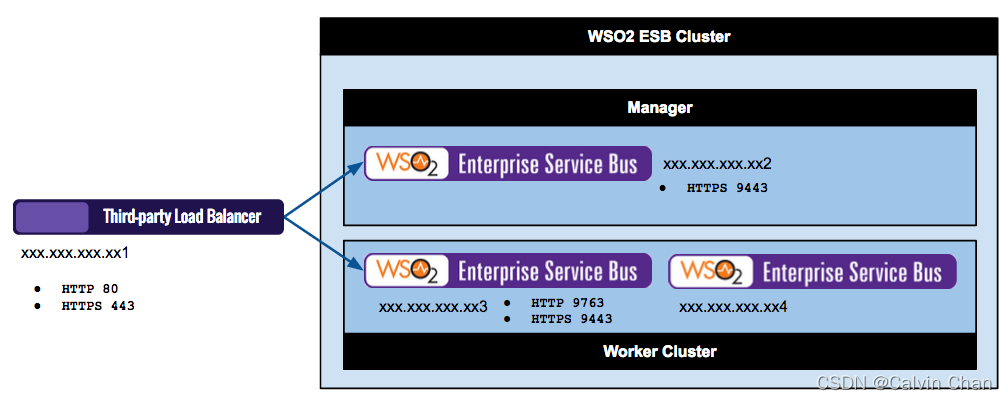
在这里,我们使用三个节点作为知名成员,一个是管理节点,另外两个是工作节点。 始终建议使用至少两个知名成员,以防止在某个知名成员关闭时重新启动集群中的所有节点。
负载均衡器自动在多个 WSO2 产品实例之间分配传入流量。它能够在集群中实现更高级别的容错,并提供分配流量所需的负载平衡。
本实例用了 3 台虚拟机,这里 Nginx 和管理节点放在同一台虚拟机。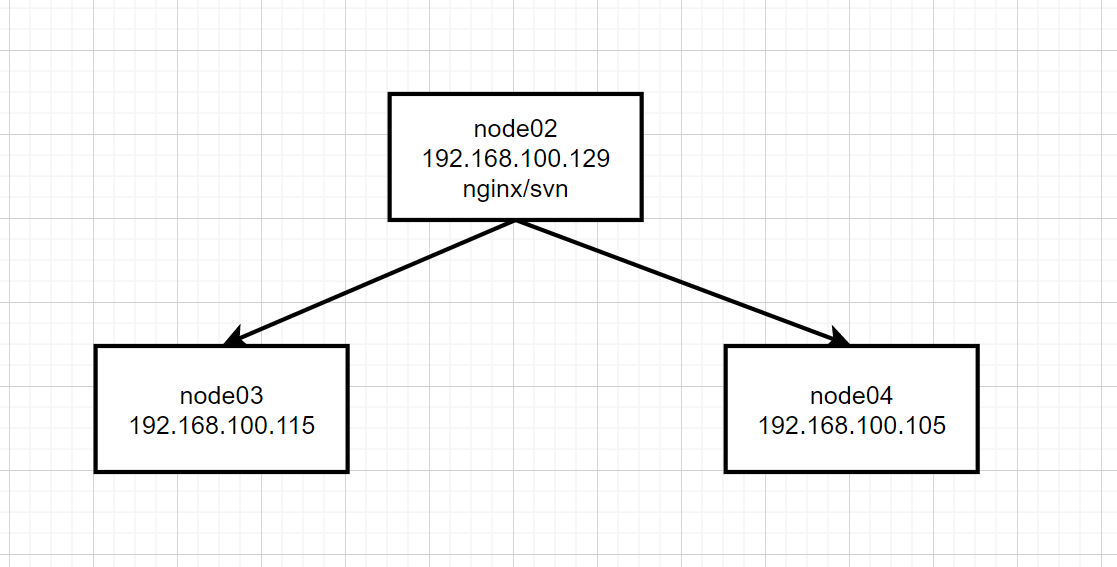
本博客的配置步骤是在假设该 ESB 集群的负载均衡器使用公开默认的 8000 和 8043 端口的情况下编写的。
如果使用域名,可以利用 80 和 443 端口做代理。
请注意以下几点:
如上面的部署模式所示,负载均衡器端口是 HTTP 8000 和 HTTPS 8043。
使用 http://192.168.100.129:8000/service 通过 HTTP 8000 端口将 HTTP 请求定向到工作节点。
使用 https://192.168.100.129:8043/service 通过 HTTPS 8043 端口将 HTTPS 请求定向到工作节点。
通过 HTTPS 8443 端口以 https://192.168.100.129:8443/carbon 身份访问管理控制台
在 WSO2 ESB 集群中,工作节点在 PassThrough 传输端口(8280 和 8243)上处理服务请求,并且可以使用 HTTPS 8443 端口访问管理控制台。
拦截管理节点 8000 端口请求并转发到 115/105 两台机器的 8280 端口的 WSO2 ESB
upstream worker_node {
    server 192.168.100.115:8280;
    server 192.168.100.105:8280;
}

server {
    listen 8000;
    server_name 192.168.100.129;
    location / {
        proxy_set_header X-Forwarded-Host $host;
        proxy_set_header X-Forwarded-Server $host;
        proxy_set_header X-Forwarded-For $proxy_add_x_forwarded_for;
        proxy_set_header Host $http_host;
        proxy_read_timeout 5m;
        proxy_send_timeout 5m;
        proxy_pass http://worker_node;
    }
}
拦截管理节点 8043 端口请求并转发到 115/105 两台机器的 8243 端口的 WSO2 ESB
upstream ssl_worker_node {
    server 192.168.100.115:8243;
    server 192.168.100.105:8243;

}

server {
listen 8043;
    server_name 192.168.100.129;
    ssl on;
    ssl_certificate /usr/local/nginx/ssl/wrk.crt;
    ssl_certificate_key /usr/local/nginx/ssl/wrk.key;
    location / {
        proxy_set_header X-Forwarded-Host $host;
        proxy_set_header X-Forwarded-Server $host;
        proxy_set_header X-Forwarded-For $proxy_add_x_forwarded_for;
        proxy_set_header Host $http_host;
        proxy_read_timeout 5m;
        proxy_send_timeout 5m;
        proxy_pass https://ssl_worker_node;
    }
}
拦截管理节点 8443 端口请求并转发到管理节点,通过 9443 端口访问管理控制台
server {
    listen 8443;
    server_name 192.168.100.129;
    ssl on;
    ssl_certificate /usr/local/nginx/ssl/wrk.crt;
    ssl_certificate_key /usr/local/nginx/ssl/wrk.key;

    location / {
        proxy_set_header X-Forwarded-Host $host;
        proxy_set_header X-Forwarded-Server $host;
        proxy_set_header X-Forwarded-For $proxy_add_x_forwarded_for;
        proxy_set_header Host $http_host;
        proxy_read_timeout 5m;
        proxy_send_timeout 5m;
        proxy_pass https://192.168.100.129:9443/;
    }
    error_log  /usr/local/nginx/logs/mgt-error.log ;
    access_log  /usr/local/nginx/logs/mgt-access.log;
}
cd /usr/local/nginx
mkdir ssl
cd ssl
openssl genrsa -des3 -out wrk.key 1024
openssl req -new -key wrk.key -out wrk.csr
cp wrk.key wrk.key.org
openssl rsa -in wrk.key.org -out wrk.key
openssl x509 -req -days 365 -in wrk.csr -signkey wrk.key -out wrk.crt
yum install -y subversion
mkdir /home/wxhntmy
mkdir /home/wxhntmy/svn
svnadmin create /home/wxhntmy/svn/test
cd /home/wxhntmy/svn/test
vim /home/wxhntmy/svn/test/conf/svnserve.conf
### This file controls the configuration of the svnserve daemon, if you
### use it to allow access to this repository.  (If you only allow
### access through http: and/or file: URLs, then this file is
### irrelevant.)

### Visit http://subversion.apache.org/ for more information.

[general]
### The anon-access and auth-access options control access to the
### repository for unauthenticated (a.k.a. anonymous) users and
### authenticated users, respectively.
### Valid values are "write", "read", and "none".
### Setting the value to "none" prohibits both reading and writing;
### "read" allows read-only access, and "write" allows complete
### read/write access to the repository.
### The sample settings below are the defaults and specify that anonymous
### users have read-only access to the repository, while authenticated
### users have read and write access to the repository.
# 匿名用户的权限
anon-access = read
# 权限用户的权限
auth-access = write
### The password-db option controls the location of the password
### database file.  Unless you specify a path starting with a /,
### the file's location is relative to the directory containing
### this configuration file.
### If SASL is enabled (see below), this file will NOT be used.
### Uncomment the line below to use the default password file.
# 用户账号和密码的文件位置
password-db = passwd
### The authz-db option controls the location of the authorization
### rules for path-based access control.  Unless you specify a path
### starting with a /, the file's location is relative to the the
### directory containing this file.  If you don't specify an
### authz-db, no path-based access control is done.
### Uncomment the line below to use the default authorization file.
# 权限文件的位置
authz-db = authz
### This option specifies the authentication realm of the repository.
### If two repositories have the same authentication realm, they should
### have the same password database, and vice versa.  The default realm
### is repository's uuid.
# realm = My First Repository
### The force-username-case option causes svnserve to case-normalize
### usernames before comparing them against the authorization rules in the
### authz-db file configured above.  Valid values are "upper" (to upper-
### case the usernames), "lower" (to lowercase the usernames), and
### "none" (to compare usernames as-is without case conversion, which
### is the default behavior).
# force-username-case = none

[sasl]
### This option specifies whether you want to use the Cyrus SASL
### library for authentication. Default is false.
### This section will be ignored if svnserve is not built with Cyrus
### SASL support; to check, run 'svnserve --version' and look for a line
### reading 'Cyrus SASL authentication is available.'
# use-sasl = true
### These options specify the desired strength of the security layer
### that you want SASL to provide. 0 means no encryption, 1 means
### integrity-checking only, values larger than 1 are correlated
### to the effective key length for encryption (e.g. 128 means 128-bit
### encryption). The values below are the defaults.
# min-encryption = 0
# max-encryption = 256
vim /home/wxhntmy/svn/test/conf/passwd
### This file is an example password file for svnserve.
### Its format is similar to that of svnserve.conf. As shown in the
### example below it contains one section labelled [users].
### The name and password for each user follow, one account per line.

[users]
# harry = harryssecret
# sally = sallyssecret
wxhntmy = 123456
vim /home/wxhntmy/svn/test/conf/authz
### This file is an example authorization file for svnserve.
### Its format is identical to that of mod_authz_svn authorization
### files.
### As shown below each section defines authorizations for the path and
### (optional) repository specified by the section name.
### The authorizations follow. An authorization line can refer to:
###  - a single user,
###  - a group of users defined in a special [groups] section,
###  - an alias defined in a special [aliases] section,
###  - all authenticated users, using the '$authenticated' token,
###  - only anonymous users, using the '$anonymous' token,
###  - anyone, using the '*' wildcard.
###
### A match can be inverted by prefixing the rule with '~'. Rules can
### grant read ('r') access, read-write ('rw') access, or no access
### ('').

[aliases]
# joe = /C=XZ/ST=Dessert/L=Snake City/O=Snake Oil, Ltd./OU=Research Institute/CN=Joe Average

[groups]
### 若要定义组,以该形式进行定义
# harry_and_sally = harry,sally
# harry_sally_and_joe = harry,sally,&joe

### 若库中存在/foo/bar文件,并且该文件对不同用户开发不同的权限,可以如此定义
# [/foo/bar]
# harry = rw
# &joe = r
### * 代表匿名用户,""代表none
# * =
[/]
wxhntmy = rw
[/tmp]
* = r

### 讲svn库文件配置文件进行统一管理的情况,repository指明仓库名,/bar/fuz指明仓库中的文件
# [repository:/baz/fuz]
# @harry_and_sally = rw
# * = r
svnserve -d -r /home/wxhntmy/svn
创建以下数据库和关联的数据源
数据库 | 描述 |
WSO2_USER_DB | JDBC 用户存储和授权管理器 |
REGISTRY_DB | 在产品节点中安装用于配置和治理注册表的共享数据库 |
REGISTRY_LOCAL1 | 管理节点中的本地注册空间 |
REGISTRY_LOCAL2 | 工作节点中的本地注册空间 |
下图说明了这些数据库如何连接到管理和工作节点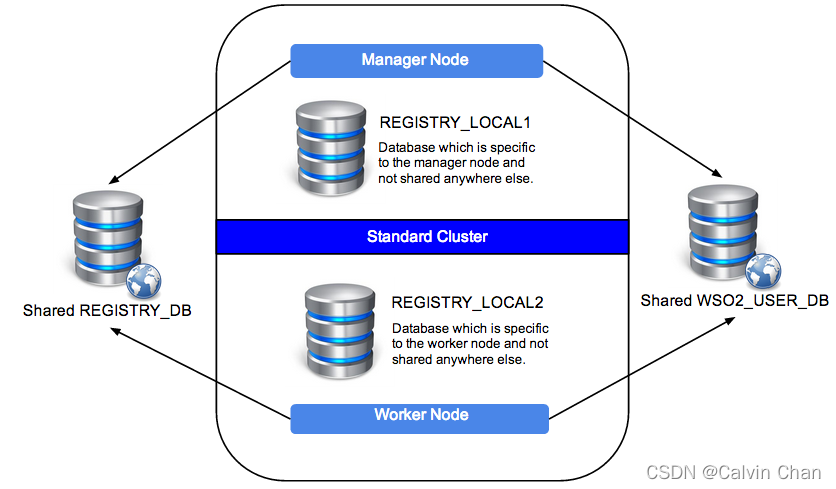
执行以下步骤来创建必要的数据库。这里使用 MySQL 作为示例,可以使用任何合适的数据库来代替。
下载并安装 MySQL 服务器。
下载 MySQL JDBC 驱动程序。
将下载的 MySQL 驱动压缩包解压,将 MySQL JDBC 驱动 JAR (mysql-connector-java-x.x.xx-bin.jar) 复制到管理节点和工作节点的
/repository/components/lib目录中。通过打开 /etc/hosts 文件并添加以下行来定义用于配置新数据库权限的主机名:
carbondb.mysql-wso2.com,仅当数据库不在本地计算机和单独的服务器上时,才需要执行此步骤。在终端/命令窗口中输入以下命令,其中 username 是要用于访问数据库的用户名:mysql -u username -p
出现提示时,使用指定的用户名指定用于访问数据库的密码。
使用以下命令创建数据库,其中
是安装的任何产品实例的路径,用户名和密码与在前面的步骤中指定的相同.关于在不同操作系统中使用 MySQL
对于 Microsoft Windows 用户,在 MySQL 中创建数据库时,将字符集指定为 latin1 很重要。不这样做可能会在启动集群时导致错误(错误代码:1709)。此错误发生在某些版本的 MySQL (5.6.x) 中,与 UTF-8 编码有关。 MySQL 最初默认使用 latin1 字符集,它以 2 字节的序列存储字符。然而,在最近的版本中,为了对国际用户更友好,MySQL 默认使用 UTF-8。因此,必须在数据库创建命令中使用 latin1 作为字符集,如下所示以避免此问题。请注意,这可能会导致非拉丁字符(如希伯来语、日语等)出现问题。以下是数据库创建命令的 sql。
create database <DATABASE_NAME> character set latin1;
对于其他操作系统的用户,标准的数据库创建命令就足够了。对于这些操作系统,以下是数据库创建命令的 sql。
create database <DATABASE_NAME>;
create database WSO2_USER_DB character set latin1;
use WSO2_USER_DB;
source <PRODUCT_HOME>\dbscripts\mysql5.7.sql;
source <PRODUCT_HOME>\dbscripts\identity\mysql-5.7+.sql;
grant all on *.* TO regadmin@"%" identified by "regadmin";

create database REGISTRY_DB character set latin1;
use REGISTRY_DB;
source <PRODUCT_HOME>\dbscripts\mysql5.7.sql;
grant all on *.* TO regadmin@"%" identified by "regadmin";

create database REGISTRY_LOCAL1 character set latin1;
use REGISTRY_LOCAL1;
source <PRODUCT_HOME>\dbscripts\mysql5.7.sql;
grant all on *.* TO regadmin@"%" identified by "regadmin";

create database REGISTRY_LOCAL2 character set latin1;
use REGISTRY_LOCAL2;
source <PRODUCT_HOME>\dbscripts\mysql5.7.sql;
grant all on *.* TO regadmin@"%" identified by "regadmin";

alter user 'regadmin'@'%' identified by 'regadmin';
flush privileges;
在管理器节点上,打开/repository/conf/datasources/master-datasource.xml文件,并将数据源配置为指向 REGISTRYLOCAL1、WSO2REGISTRYDB 和 WSO2USER_DB 数据库,如下所示(更改用户名、密码和数据库 环境所需的 URL)。
<datasources-configuration xmlns:svns="http://org.wso2.securevault/configuration"> <providers> <provider>org.wso2.carbon.ndatasource.rdbms.RDBMSDataSourceReader</provider> </providers> <datasources> <datasource> <name>REGISTRY_LOCAL1</name> <description>The datasource used for registry- local</description> <jndiConfig> <name>jdbc/WSO2CarbonDB</name> </jndiConfig> <definition type="RDBMS"> <configuration> <url>jdbc:mysql://192.168.100.129:3306/REGISTRY_LOCAL1?autoReconnect=true&useUnicode=true&characterEncoding=utf8&useSSL=false&allowPublicKeyRetrieval=true&serverTimezone=GMT%2B8</url> <username>regadmin</username> <password>regadmin</password> <driverClassName>com.mysql.jdbc.Driver</driverClassName> <maxActive>50</maxActive> <maxWait>60000</maxWait> <testOnBorrow>true</testOnBorrow> <validationQuery>SELECT 1</validationQuery> <validationInterval>30000</validationInterval> </configuration> </definition> </datasource> <datasource> <name>REGISTRY_DB</name> <description>The datasource used for registry- config/governance</description> <jndiConfig> <name>jdbc/WSO2RegistryDB</name> </jndiConfig> <definition type="RDBMS"> <configuration> <url>jdbc:mysql://192.168.100.129:3306/REGISTRY_DB?autoReconnect=true&useUnicode=true&characterEncoding=utf8&useSSL=false&allowPublicKeyRetrieval=true&serverTimezone=GMT%2B8</url> <username>regadmin</username> <password>regadmin</password> <driverClassName>com.mysql.jdbc.Driver</driverClassName> <maxActive>50</maxActive> <maxWait>60000</maxWait> <testOnBorrow>true</testOnBorrow> <validationQuery>SELECT 1</validationQuery> <validationInterval>30000</validationInterval> </configuration> </definition> </datasource> <datasource> <name>WSO2_USER_DB</name> <description>The datasource used for registry and user manager</description> <jndiConfig> <name>jdbc/WSO2UMDB</name> </jndiConfig> <definition type="RDBMS"> <configuration> <url>jdbc:mysql://192.168.100.129:3306/WSO2_USER_DB?useUnicode=true&characterEncoding=utf8&useSSL=false&allowPublicKeyRetrieval=true&serverTimezone=GMT%2B8</url> <username>regadmin</username> <password>regadmin</password> <driverClassName>com.mysql.jdbc.Driver</driverClassName> <maxActive>50</maxActive> <maxWait>60000</maxWait> <testOnBorrow>true</testOnBorrow> <validationQuery>SELECT 1</validationQuery> <validationInterval>30000</validationInterval> </configuration> </definition> </datasource> </datasources> </datasources-configuration>
要配置数据源,请更新管理器节点的/repository/conf/user-mgt.xml中的 dataSource 属性,如下所示:
<Property name="dataSource">jdbc/WSO2UMDB</Property>

必须更新管理节点的/repository/conf/registry.xml文件中的 dataSource 属性,如下所示。
<dbConfig name="wso2registry">
    <dataSource>jdbc/WSO2CarbonDB</dataSource>
</dbConfig>

在工作节点上,打开/repository/conf/datasources/master-datasource.xml文件并将数据源配置为指向 REGISTRYLOCAL2、WSO2REGISTRYDB 和 WSO2USER_DB 数据库,如下所示(更改用户名、密码和数据库 URL 根据您的环境需要):
<datasources-configuration xmlns:svns="http://org.wso2.securevault/configuration"> <providers> <provider>org.wso2.carbon.ndatasource.rdbms.RDBMSDataSourceReader</provider> </providers> <datasources> <datasource> <name>REGISTRY_LOCAL2</name> <description>The datasource used for registry- local</description> <jndiConfig> <name>jdbc/WSO2CarbonDB</name> </jndiConfig> <definition type="RDBMS"> <configuration> <url>jdbc:mysql://192.168.100.129:3306/REGISTRY_LOCAL2?autoReconnect=true&useUnicode=true&characterEncoding=utf8&useSSL=false&allowPublicKeyRetrieval=true&serverTimezone=GMT%2B8</url> <username>regadmin</username> <password>regadmin</password> <driverClassName>com.mysql.jdbc.Driver</driverClassName> <maxActive>50</maxActive> <maxWait>60000</maxWait> <testOnBorrow>true</testOnBorrow> <validationQuery>SELECT 1</validationQuery> <validationInterval>30000</validationInterval> </configuration> </definition> </datasource> <datasource> <name>REGISTRY_DB</name> <description>The datasource used for registry- config/governance</description> <jndiConfig> <name>jdbc/WSO2RegistryDB</name> </jndiConfig> <definition type="RDBMS"> <configuration> <url>jdbc:mysql://192.168.100.129:3306/REGISTRY_DB?autoReconnect=true&useUnicode=true&characterEncoding=utf8&useSSL=false&allowPublicKeyRetrieval=true&serverTimezone=GMT%2B8</url> <username>regadmin</username> <password>regadmin</password> <driverClassName>com.mysql.jdbc.Driver</driverClassName> <maxActive>50</maxActive> <maxWait>60000</maxWait> <testOnBorrow>true</testOnBorrow> <validationQuery>SELECT 1</validationQuery> <validationInterval>30000</validationInterval> </configuration> </definition> </datasource> <datasource> <name>WSO2_USER_DB</name> <description>The datasource used for registry and user manager</description> <jndiConfig> <name>jdbc/WSO2UMDB</name> </jndiConfig> <definition type="RDBMS"> <configuration> <url>jdbc:mysql://192.168.100.129:3306/WSO2_USER_DB?useUnicode=true&characterEncoding=utf8&useSSL=false&allowPublicKeyRetrieval=true&serverTimezone=GMT%2B8</url> <username>regadmin</username> <password>regadmin</password> <driverClassName>com.mysql.jdbc.Driver</driverClassName> <maxActive>50</maxActive> <maxWait>60000</maxWait> <testOnBorrow>true</testOnBorrow> <validationQuery>SELECT 1</validationQuery> <validationInterval>30000</validationInterval> </configuration> </definition> </datasource> </datasources> </datasources-configuration>
配置数据源,更新工作节点的/repository/conf/user-mgt.xml文件中的 dataSource 属性,如下所示。
<Property name="dataSource">jdbc/WSO2UMDB</Property>
必须更新工作节点的/repository/conf/registry.xml文件中的 dataSource 属性,如下所示。
<dbConfig name="wso2registry">
    <dataSource>jdbc/WSO2CarbonDB</dataSource>
</dbConfig>
执行此步骤以确保用于治理和配置的共享注册表安装到两个节点。 此数据库是 REGISTRY_DB。
在管理节点的/repository/conf/registry.xml文件中配置共享注册表数据库和挂载详细信息,如下所示:
注意:添加以下配置时,不得删除名为 wso2registry 的现有 dbConfig。
<dbConfig name="sharedregistry"> <dataSource>jdbc/WSO2RegistryDB</dataSource> </dbConfig> <remoteInstance url="https://localhost:9443/registry"> <id>manager</id> <dbConfig>sharedregistry</dbConfig> <readOnly>false</readOnly><!--管理节点要设为false--> <enableCache>true</enableCache> <registryRoot>/</registryRoot> <cacheId>regadmin@jdbc:mysql://192.168.100.129:3306/REGISTRY_DB?autoReconnect=true&useUnicode=true&characterEncoding=utf8&useSSL=false&allowPublicKeyRetrieval=true&serverTimezone=GMT%2B8</cacheId> </remoteInstance> <mount path="/_system/config" overwrite="true"> <instanceId>manager</instanceId> <targetPath>/_system/config</targetPath> </mount> <mount path="/_system/governance" overwrite="true"> <instanceId>manager</instanceId> <targetPath>/_system/governance</targetPath> </mount>
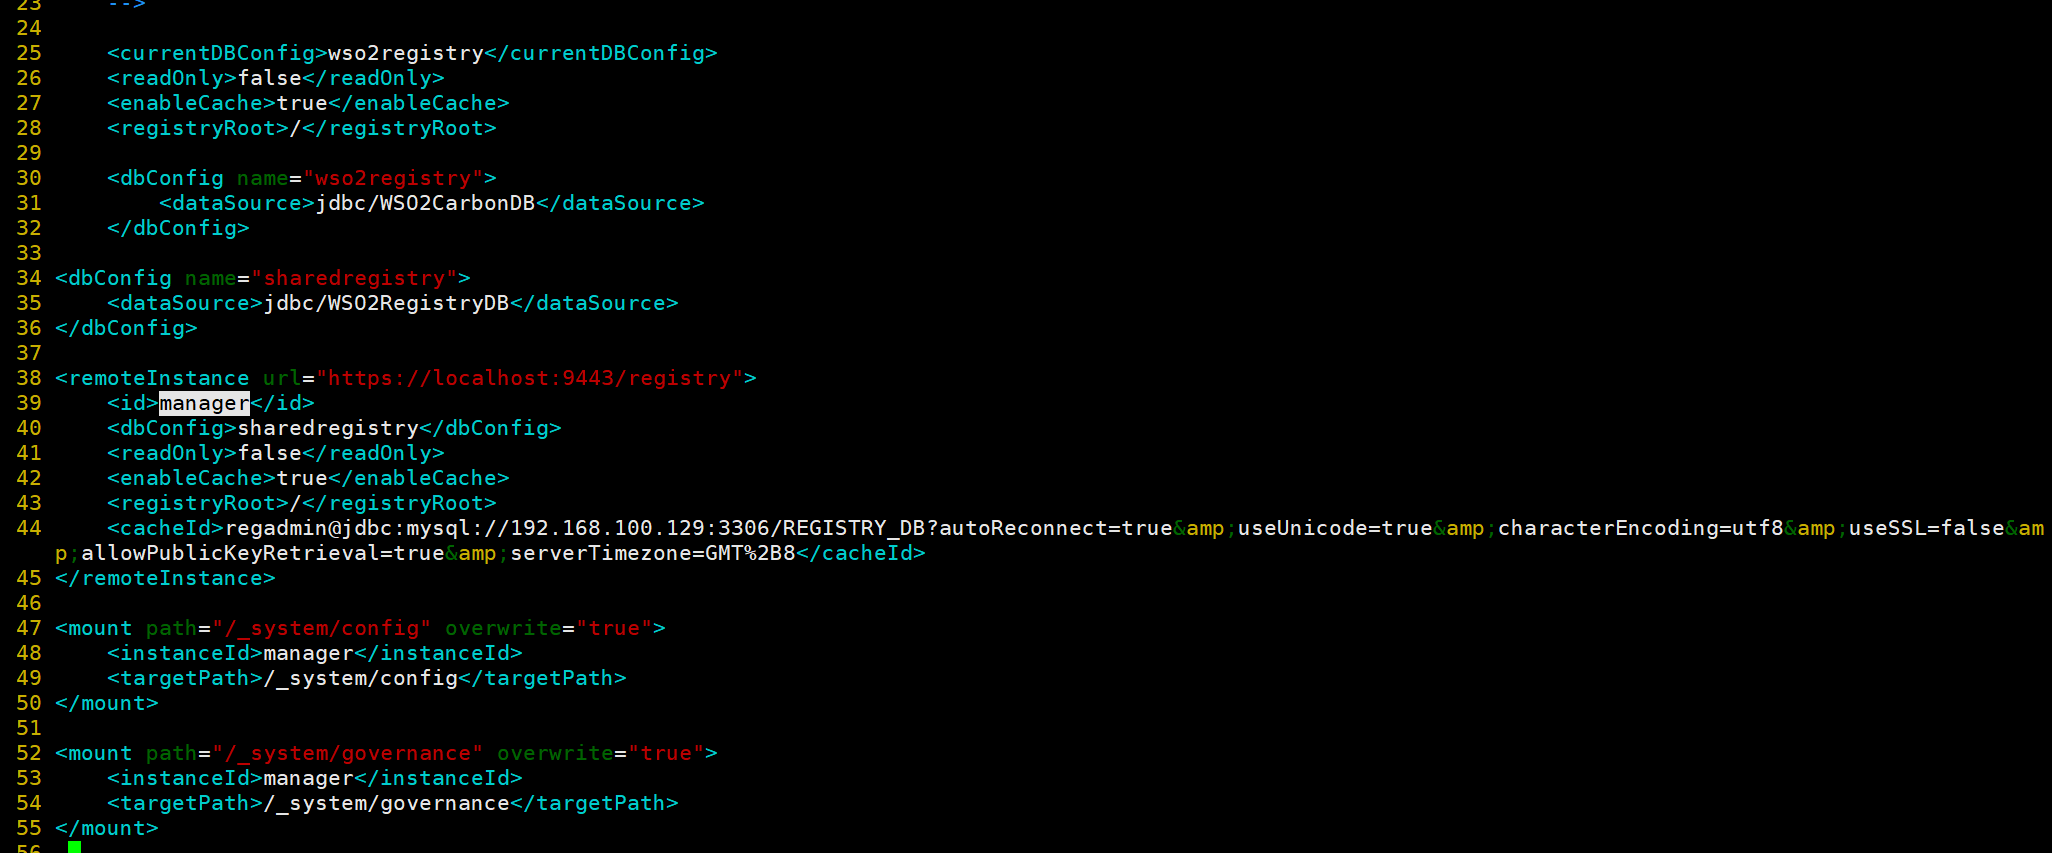
在工作节点的/repository/conf/registry.xml中配置共享注册表数据库和挂载详细信息,如下所示:
<dbConfig name="sharedregistry"> <dataSource>jdbc/WSO2RegistryDB</dataSource> </dbConfig> <remoteInstance url="https://localhost:9443/registry"> <id>worker</id> <dbConfig>sharedregistry</dbConfig> <readOnly>true</readOnly><!--工作节点要设为true--> <enableCache>true</enableCache> <registryRoot>/</registryRoot> <cacheId>regadmin@jdbc:mysql://192.168.100.129:3306/REGISTRY_DB?autoReconnect=true&useUnicode=true&characterEncoding=utf8&useSSL=false&allowPublicKeyRetrieval=true&serverTimezone=GMT%2B8</cacheId> </remoteInstance> <mount path="/_system/config" overwrite="true"> <instanceId>worker</instanceId> <targetPath>/_system/config</targetPath> </mount> <mount path="/_system/governance" overwrite="true"> <instanceId>worker</instanceId> <targetPath>/_system/governance</targetPath> </mount>
以下是添加这些配置时需要注意的一些要点:
在标签下指定的 dataSource 必须与 manager 和 worker 的 master-datasources.xml 文件中指定的 jndiConfig 名称匹配。
注册表挂载路径用于标识注册表的类型。例如,/system/config指的是配置注册表,/system/governance指的是治理注册表。
dbconfig 条目使您能够识别您在 master-datasources.xml 文件中配置的数据源。使用唯一名称 sharedregistry 来引用该数据源条目。
remoteInstance 部分是指外部注册表挂载。可以指定此实例的只读/读写性质以及缓存配置和注册表根位置。如果是工作节点,readOnly 属性应该是 true,如果是管理器节点,这个属性应该设置为 false。
此外,必须指定 cacheId,它使缓存能够在集群环境中正常运行。请注意,cacheId 与注册表数据库的 JDBC 连接 URL 相同。该值是远程实例的 cacheId。这里的cacheId应该是$databaseusername@$databaseurl的格式,其中$databaseusername是远程实例数据库的用户名,$databaseurl是远程实例数据库的URL。此 cacheID 用于标识启用缓存时应查找的缓存。在这种情况下,我们应该连接的数据库是 REGISTRY_DB,它是所有 master/workers 节点共享的数据库。可以通过查看使用相同数据源的安装配置来识别它。
必须为每个远程实例定义一个唯一名称 id,然后从挂载配置中引用该名称。在上面的示例中,远程实例的唯一 ID 是 manager。
在每个挂载配置中,指定实际挂载路径和目标挂载路径。 targetPath 可以是任何有意义的名称。在本例中,它是 /_system/config。
编辑/repository/conf/axis2/axis2.xml文件如下。
<clustering class="org.wso2.carbon.core.clustering.hazelcast.HazelcastClusteringAgent" enable="true">

为启用众所周知的地址注册方法(该节点向我们稍后定义的 WKA 成员发送集群启动消息)。
<parameter name="membershipScheme">wka</parameter>

<parameter name="domain">wso2.esb.domain</parameter>

(不是 localhost 或主机名)。
<parameter name="localMemberHost">192.168.100.129</parameter>

此端口号不受/repository/conf/carbon.xml中指定的端口偏移值的影响。如果此端口号已分配给另一台服务器,则集群框架会自动增加此端口号。但是,如果两台服务器在同一台机器上运行,必须确保为每台服务器设置一个唯一的端口。
<parameter name="localMemberPort">4100</parameter>

在以下示例中,知名成员是工作程序节点。这里的hostName值是主机的 IP 地址。WKA 工作节点的port值必须与其相同 localMemberPort (在本例中为 4100)。虽然此示例仅表示一个知名成员,但建议在此至少添加两个知名成员。这样做是为了确保集群具有高可用性。
<members>
    <member>
        <hostName>192.168.100.129</hostName>
        <port>4100</port>
    </member>
    <member>
        <hostName>192.168.100.115</hostName>
        <port>4100</port>
    </member>
    <member>
        <hostName>192.168.100.105</hostName>
        <port>4100</port>
    </member>
</members>

更改以下集群属性。
<parameter name="properties">
    <property name="backendServerURL" value="http://192.168.100.129:8000/services/"/>
    <property name="mgtConsoleURL" value="https://192.168.100.129:8443/"/>
</parameter>

编辑/repository/conf/carbon.xml
<HostName>192.168.100.129</HostName>
<MgtHostName>192.168.100.129</MgtHostName>

启用基于 SVN 的部署同步,并将 AutoCommit 属性标记为 true。 为此,请编辑/repository/conf/carbon.xml文件,如下所示。
<DeploymentSynchronizer>
    <Enabled>true</Enabled>
    <AutoCommit>true</AutoCommit>
    <AutoCheckout>true</AutoCheckout>
    <RepositoryType>svn</RepositoryType>
    <SvnUrl>svn://192.168.100.129/test</SvnUrl>
    <SvnUser>wxhntmy</SvnUser>
    <SvnPassword>123456</SvnPassword>
    <SvnUrlAppendTenantId>true</SvnUrlAppendTenantId>
</DeploymentSynchronizer>

从 http://product-dist.wso2.com/tools/svnkit-all-1.8.7.wso2v1.jar 下载 SVNKit 并将复制到/repository/components/dropins 文件夹中。
下载 http://maven.wso2.org/nexus/content/groups/wso2-public/com/trilead/trilead-ssh2/1.0.0-build215/trilead-ssh2-1.0.0-build215.jar 并复制到/repository/components/lib 文件夹。
./wso2server.sh -Dsetup
编辑/repository/conf/axis2/axis2.xml文件如下。
<clustering class="org.wso2.carbon.core.clustering.hazelcast.HazelcastClusteringAgent" enable="true">

为启用众所周知的地址注册方法(该节点向我们稍后定义的 WKA 成员发送集群启动消息)。
<parameter name="membershipScheme">wka</parameter>

<parameter name="domain">wso2.esb.domain</parameter>

(不是 localhost 或主机名)。
<parameter name="localMemberHost">192.168.100.115</parameter>
此端口号不受/repository/conf/carbon.xml中指定的端口偏移值的影响。如果此端口号已分配给另一台服务器,则集群框架会自动增加此端口号。但是,如果两台服务器在同一台机器上运行,必须确保为每台服务器设置一个唯一的端口。
<parameter name="localMemberPort">4100</parameter>

在以下示例中,知名成员是工作程序节点。这里的hostName值是主机的 IP 地址。WKA 工作节点的port值必须与其相同 localMemberPort (在本例中为 4100)。虽然此示例仅表示一个知名成员,但建议在此至少添加两个知名成员。这样做是为了确保集群具有高可用性。
<members>
    <member>
        <hostName>192.168.100.129</hostName>
        <port>4100</port>
    </member>
    <member>
        <hostName>192.168.100.115</hostName>
        <port>4100</port>
    </member>
    <member>
        <hostName>192.168.100.105</hostName>
        <port>4100</port>
    </member>
</members>

更改以下集群属性。
<parameter name="properties">
    <property name="backendServerURL" value="http://192.168.100.129:8000/services/"/>
    <property name="mgtConsoleURL" value="https://192.168.100.129:8443/"/>
</parameter>

编辑/repository/conf/carbon.xml
<HostName>192.168.100.115</HostName>
<MgtHostName>192.168.100.115</MgtHostName>
启用基于 SVN 的部署同步,并将 AutoCommit 属性标记为 false。 为此,请编辑/repository/conf/carbon.xml文件,如下所示。
<DeploymentSynchronizer>
    <Enabled>true</Enabled>
    <AutoCommit>false</AutoCommit><!--工作节点 AutoCommit 属性标记为 false-->
    <AutoCheckout>true</AutoCheckout>
    <RepositoryType>svn</RepositoryType>
    <SvnUrl>svn://192.168.100.129/test</SvnUrl>
    <SvnUser>wxhntmy</SvnUser>
    <SvnPassword>123456</SvnPassword>
    <SvnUrlAppendTenantId>true</SvnUrlAppendTenantId>
</DeploymentSynchronizer>

从 http://product-dist.wso2.com/tools/svnkit-all-1.8.7.wso2v1.jar 下载 SVNKit 并将复制到/repository/components/dropins 文件夹中。
下载 http://maven.wso2.org/nexus/content/groups/wso2-public/com/trilead/trilead-ssh2/1.0.0-build215/trilead-ssh2-1.0.0-build215.jar 并复制到/repository/components/lib 文件夹。
通过刚刚配置为工作程序节点的 WSO2 产品的副本来创建第二个工作程序节点,并在/repository/conf/axis2/axis2.xml文件中更改以下内容。
<parameter name="localMemberHost">192.168.100.105</parameter>
配置 HostName。编辑/repository/conf/carbon.xml文件。
<HostName>192.168.100.105</HostName>
<MgtHostName>192.168.100.105</MgtHostName>
./wso2server.sh -DworkerNode=true
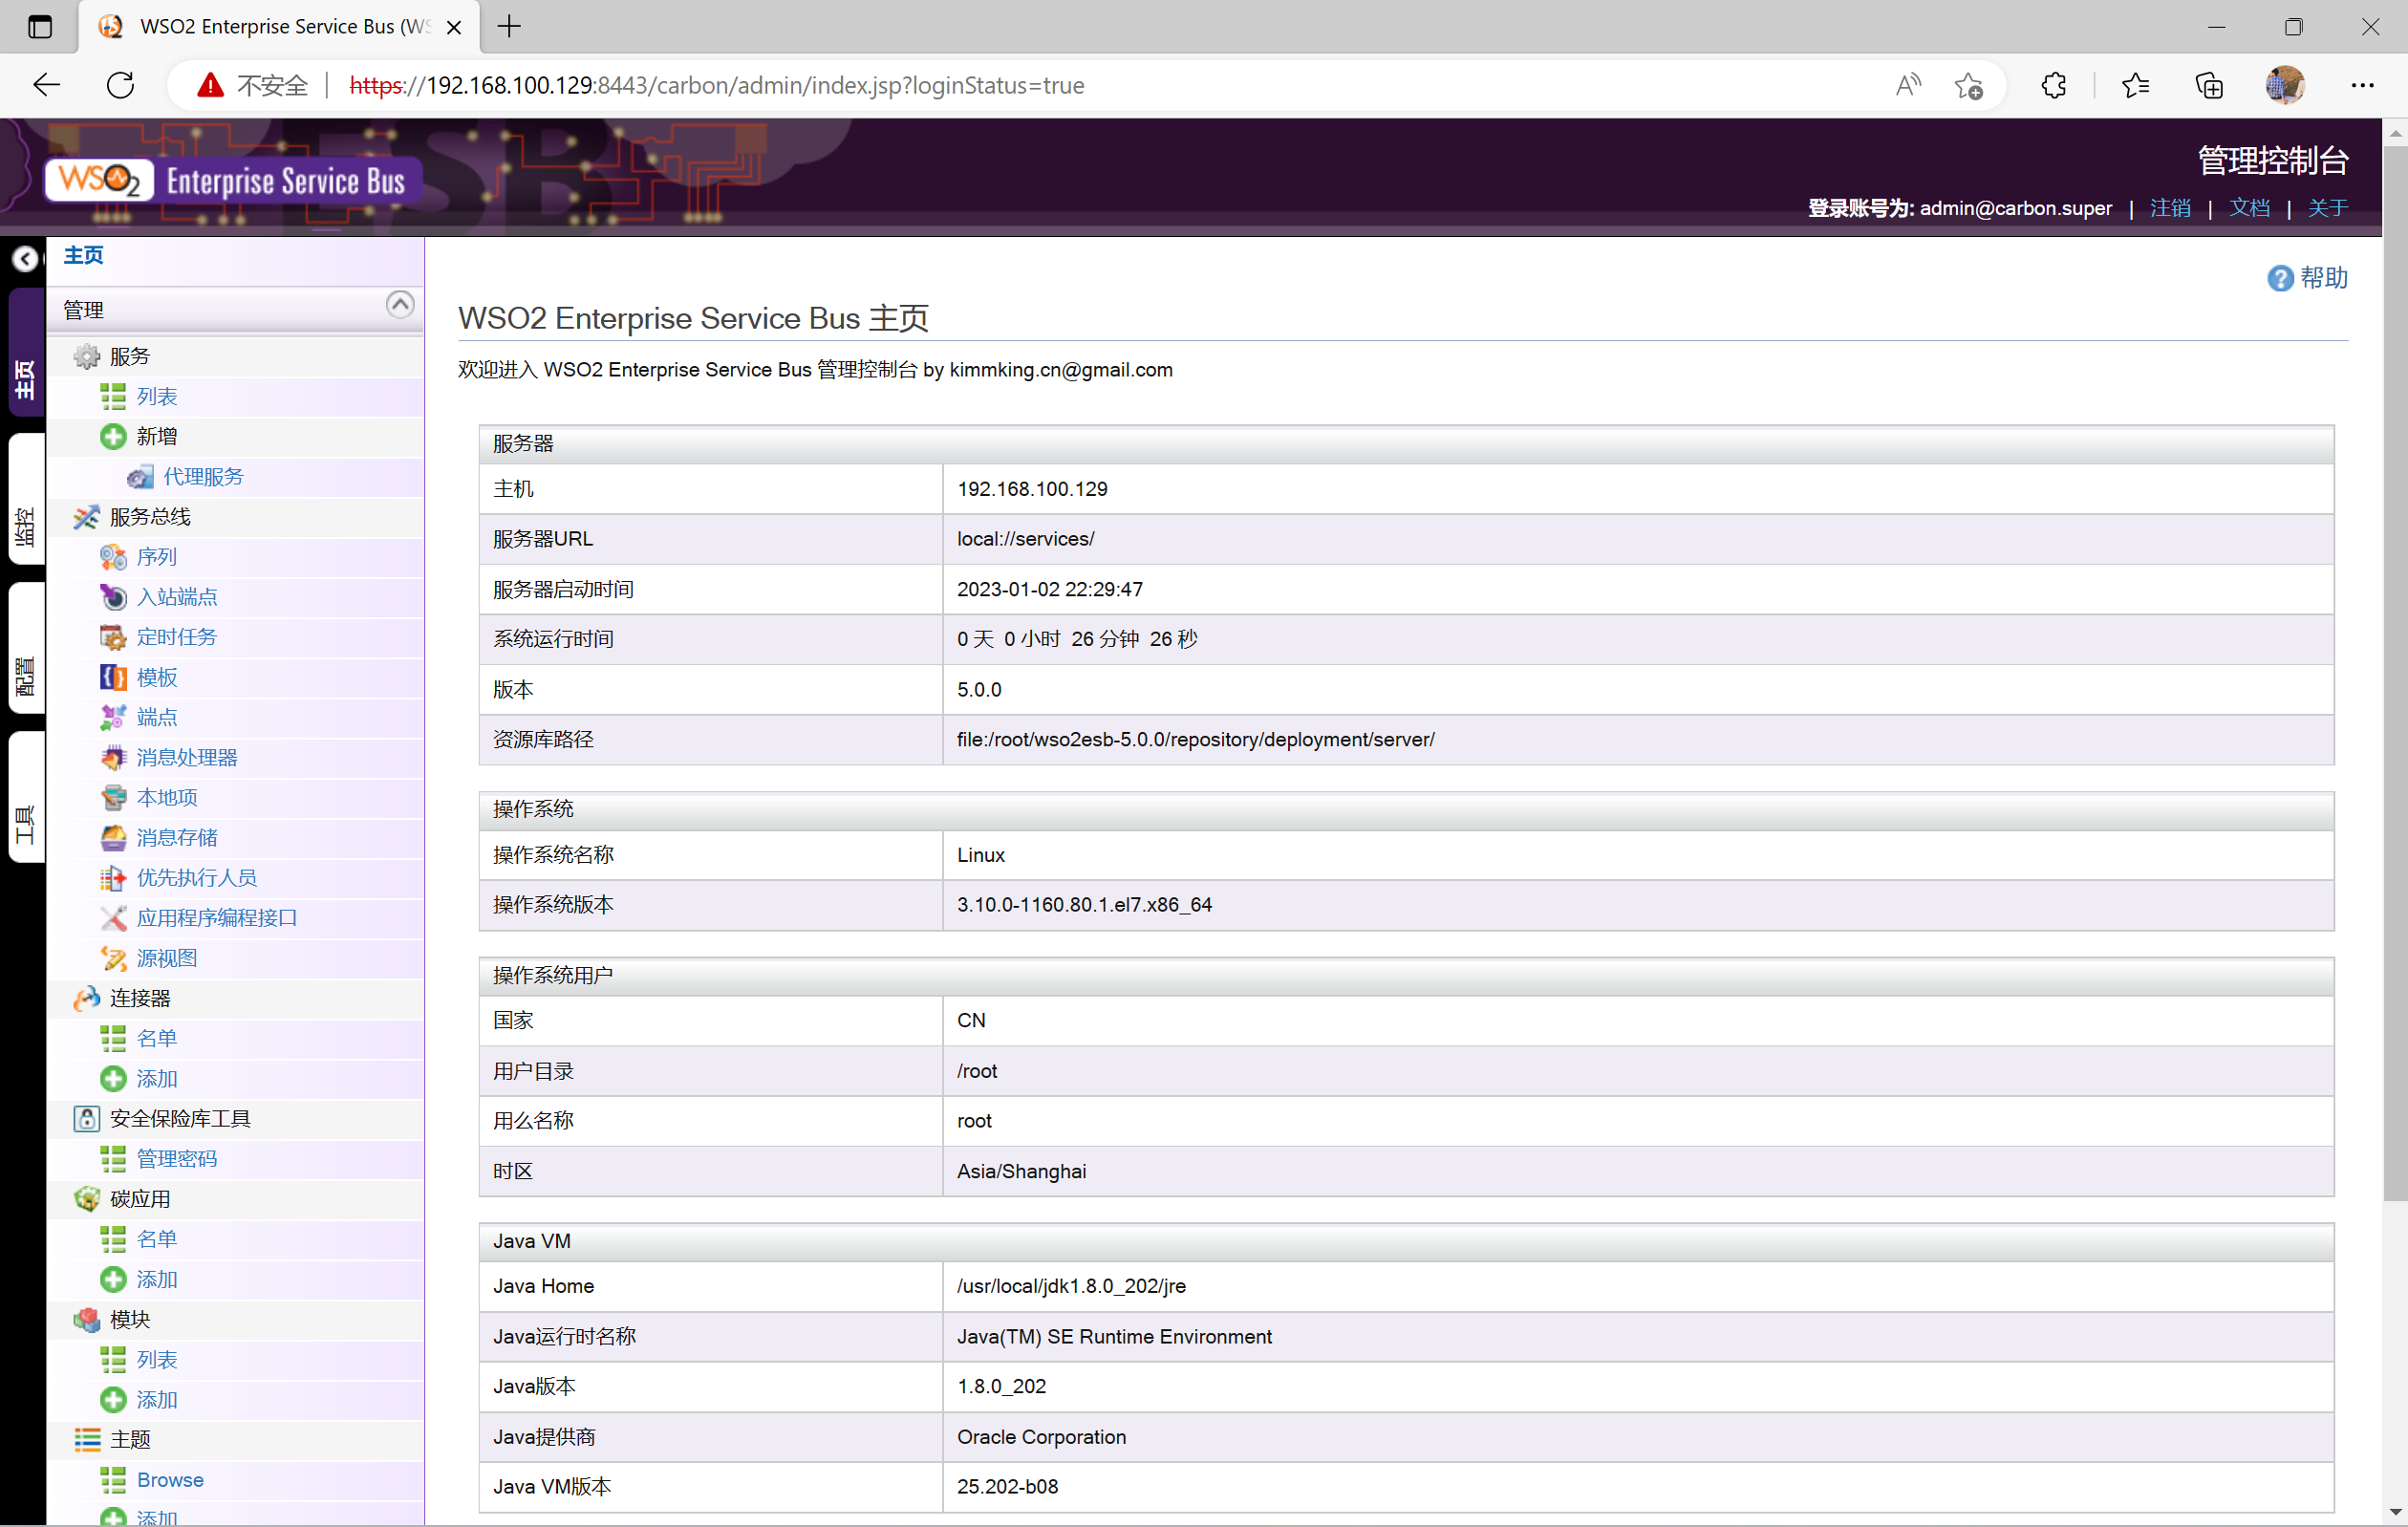
https://192.168.100.129:8443/carbon/admin/login.jsp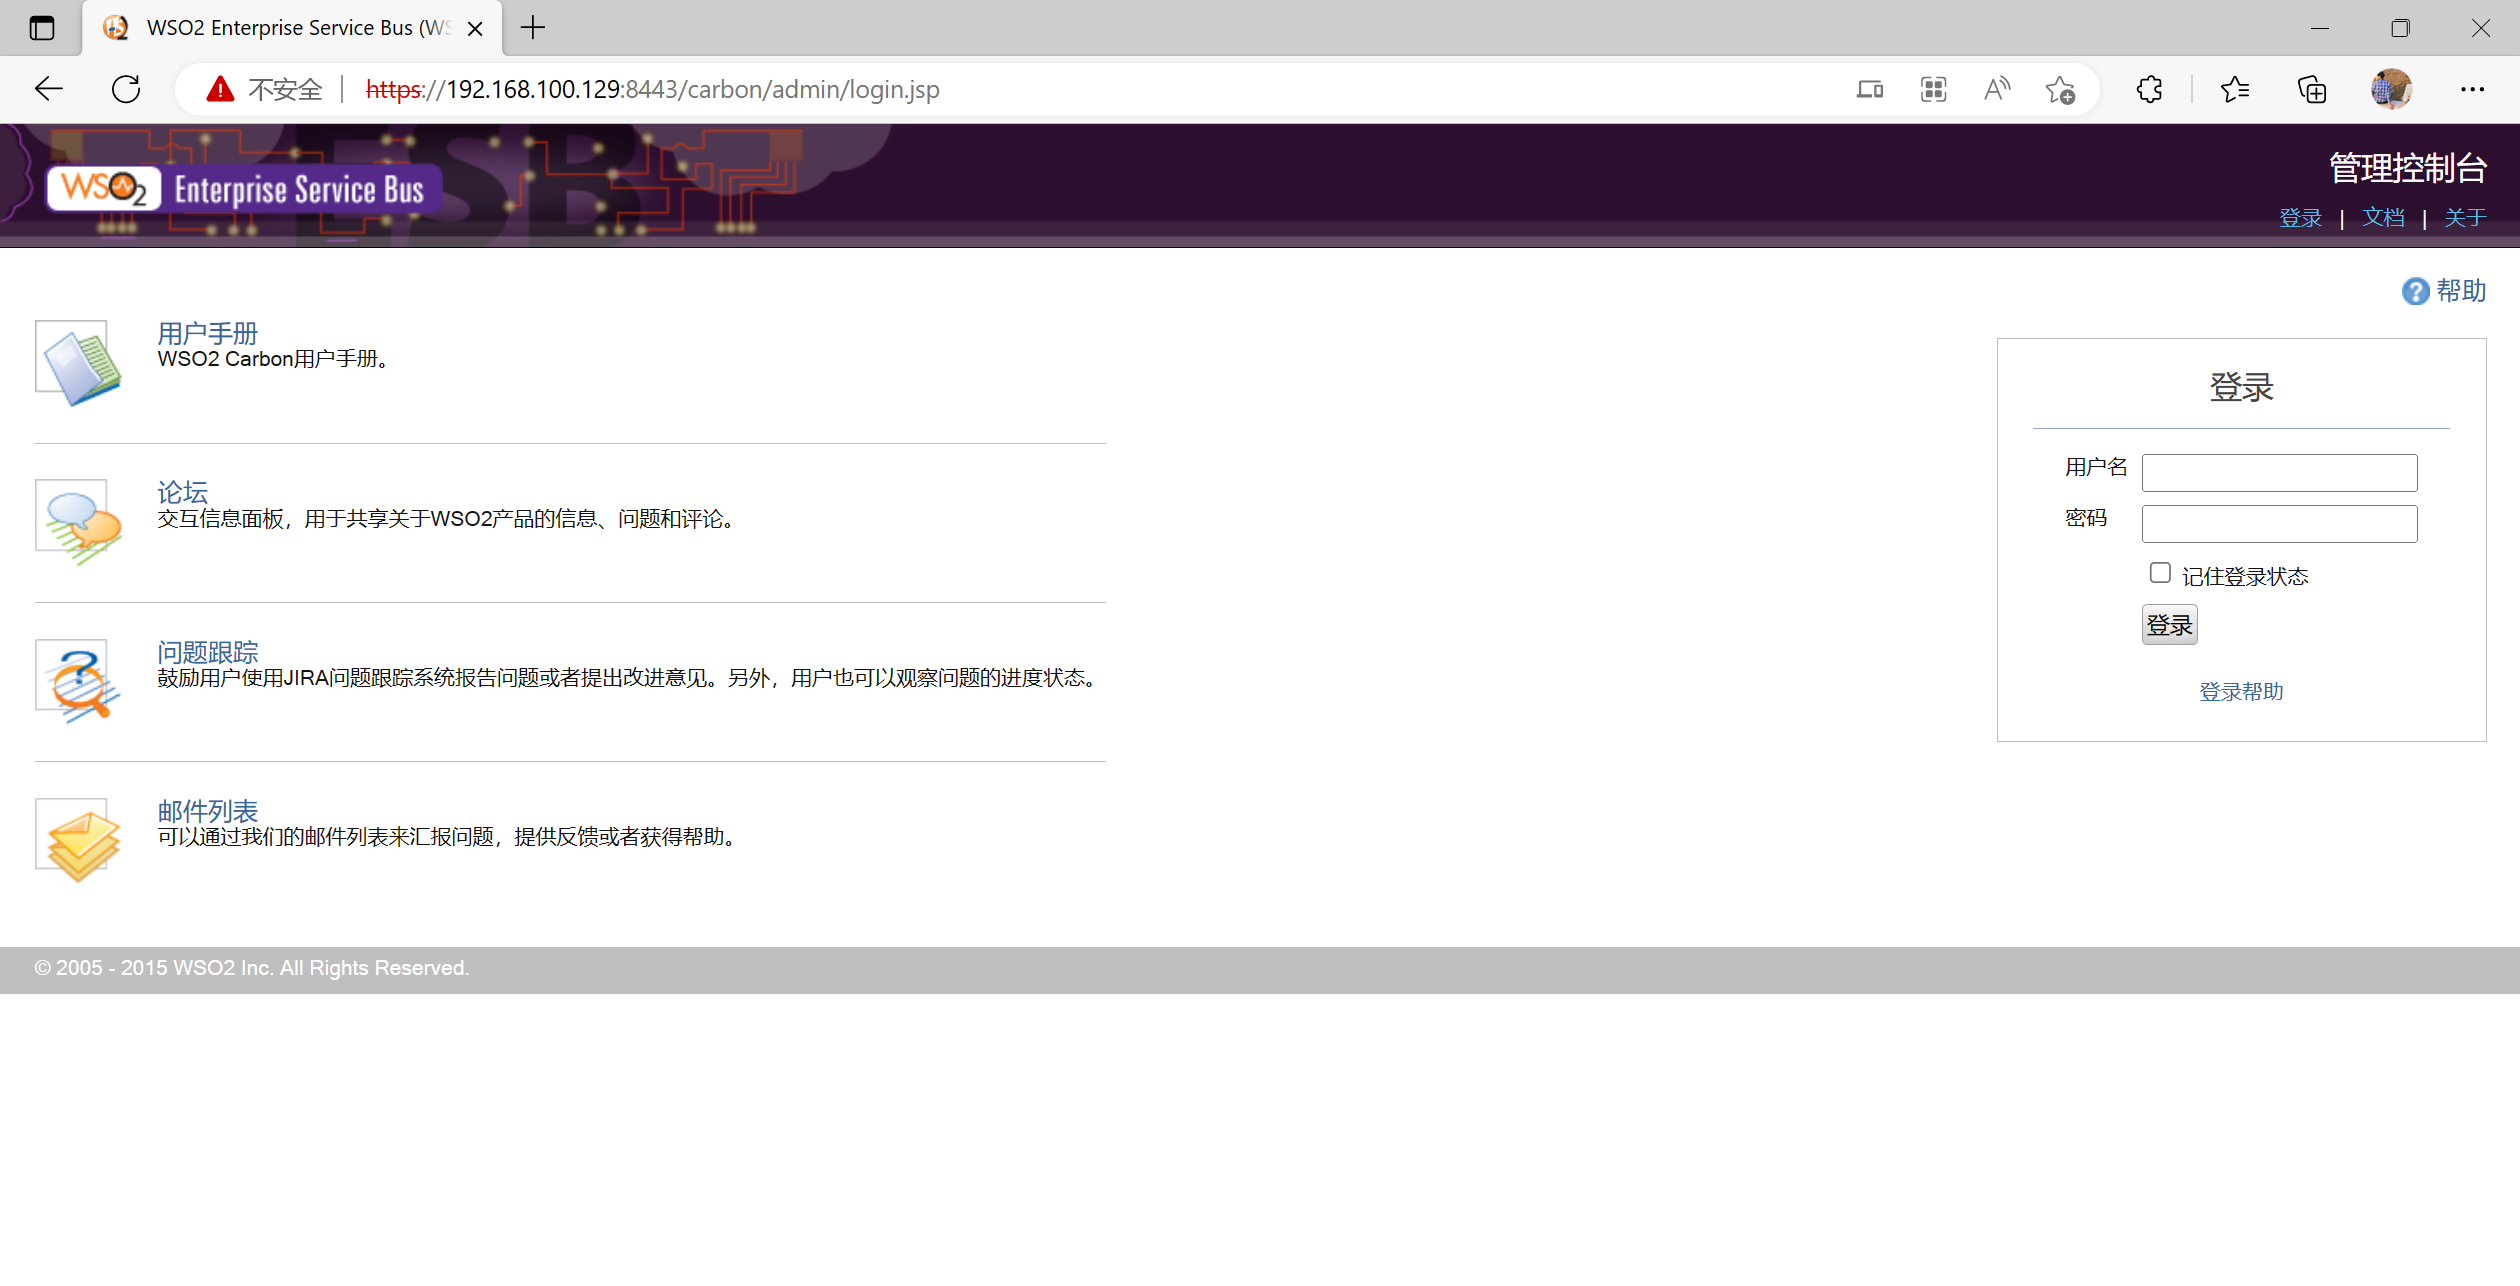
初始账号密码:admin/admin