systemctl stop firewalld
systemctl disable firewalld
sed -i 's/enforcing/disabled/' /etc/selinux/config  # 永久
setenforce 0  # 临时
swapoff -a  # 临时
sed -ri 's/.*swap.*/#&/' /etc/fstab    # 永久
hostnamectl set-hostname hostname
bash
cat >> /etc/hosts << EOF
182.160.14.196 master.wxhntmy.com master
49.7.98.114 node01.wxhntmy.com node01
EOF

modprobe br_netfilter
cat > /etc/sysconfig/modules/ipvs.modules <<EOF
#!/bin/bash
modprobe -- ip_vs
modprobe -- ip_vs_rr
modprobe -- ip_vs_wrr
modprobe -- ip_vs_sh
modprobe -- nf_conntrack #内核版本小于4.19 nf_conntrack_ipv4
EOF

chmod 755 /etc/sysconfig/modules/ipvs.modules && bash /etc/sysconfig/modules/ipvs.modules && lsmod | grep -e ip_vs -e nf_conntrack
#云服务器一般不需要
# 设置系统时区为 中国/上海
timedatectl set-timezone Asia/Shanghai
# 将当前的UTC时间写入硬件时钟
timedatectl set-local-rtc 0
# 重启依赖于系统时间的服务
systemctl restart rsyslog
systemctl restart crond
cat > /etc/yum.repos.d/kubernetes.repo << EOF
[kubernetes]
name=Kubernetes
baseurl=https://mirrors.aliyun.com/kubernetes/yum/repos/kubernetes-el7-x86_64
enabled=1
gpgcheck=0
repo_gpgcheck=0
gpgkey=https://mirrors.aliyun.com/kubernetes/yum/doc/yum-key.gpg https://mirrors.aliyun.com/kubernetes/yum/doc/rpm-package-key.gpg
EOF
yum install -y kubelet-1.23.6 kubeadm-1.23.6 kubectl-1.23.6
systemctl enable kubelet
#查看版本信息
kubectl version
kubeadm version
kubelet --version
各节点需要的镜像
vim pullimages.sh
#!/bin/bash
#pull images

ver=v1.23.6
registry=registry.cn-hangzhou.aliyuncs.com/google_containers
images=`kubeadm config images list --kubernetes-version=$ver |awk -F '/' '{print $2}'`

for image in $images
do
if [ $image != coredns ];then
    docker pull ${registry}/$image
    if [ $? -eq 0 ];then
        docker tag ${registry}/$image k8s.gcr.io/$image
        docker rmi ${registry}/$image
    else
        echo "ERROR: 下载镜像报错,$image"
    fi
else
    docker pull coredns/coredns:1.8.6
    docker tag coredns/coredns:1.8.6  k8s.gcr.io/coredns/coredns:v1.8.6
    docker rmi coredns/coredns:1.8.6
fi
done
chmod +x pullimages.sh && ./pullimages.sh
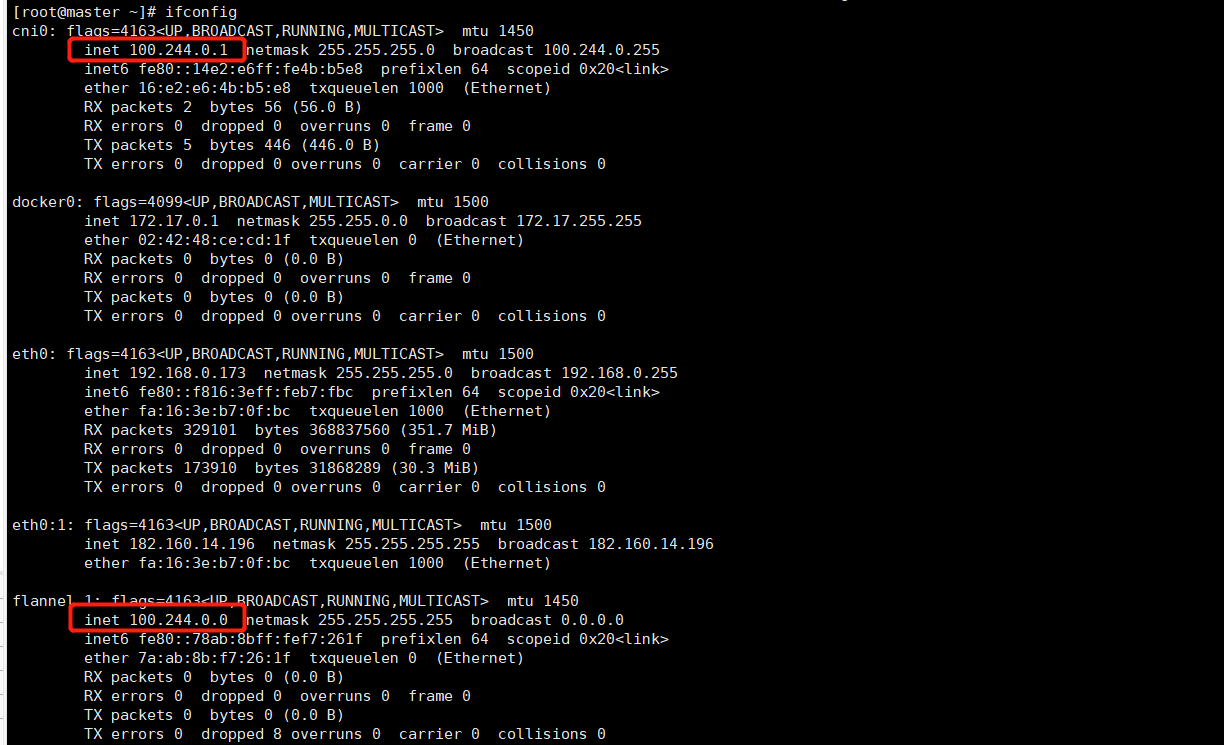
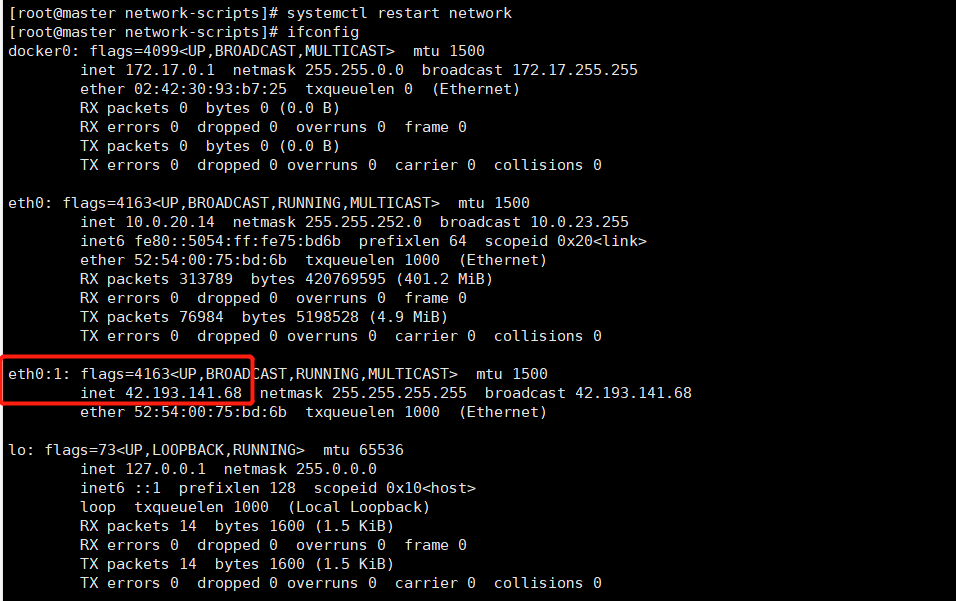
cat > /etc/sysconfig/network-scripts/ifcfg-eth0:1 <<EOF
BOOTPROTO=static
DEVICE=eth0:1
IPADDR=182.160.14.196 #你的公网IP
PREFIX=32
TYPE=Ethernet
USERCTL=no
ONBOOT=yes
EOF
#重启网卡
systemctl restart network
查看全部IP
ifconfig
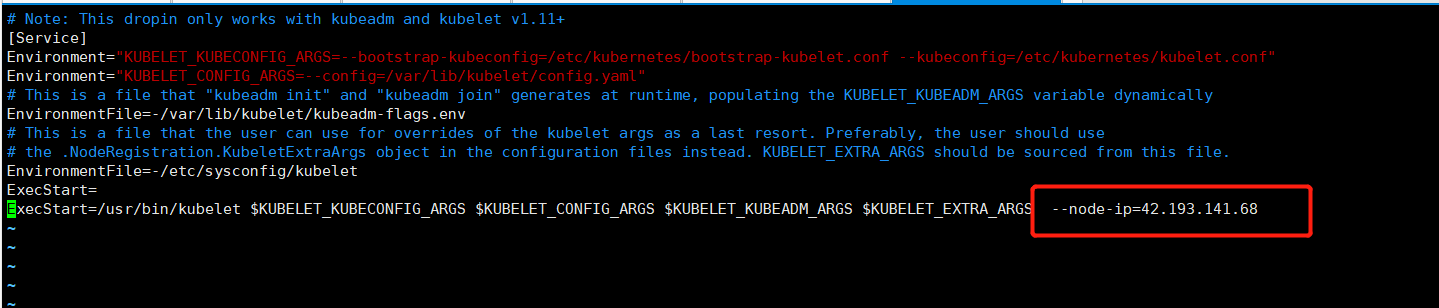
vim /usr/lib/systemd/system/kubelet.service.d/10-kubeadm.conf

[Service]
Environment="KUBELET_KUBECONFIG_ARGS=--bootstrap-kubeconfig=/etc/kubernetes/bootstrap-kubelet.conf --kubeconfig=/etc/kubernetes/kubelet.conf"
Environment="KUBELET_CONFIG_ARGS=--config=/var/lib/kubelet/config.yaml"
# This is a file that "kubeadm init" and "kubeadm join" generates at runtime, populating the KUBELET_KUBEADM_ARGS variable dynamically
EnvironmentFile=-/var/lib/kubelet/kubeadm-flags.env
# This is a file that the user can use for overrides of the kubelet args as a last resort. Preferably, the user should use
# the .NodeRegistration.KubeletExtraArgs object in the configuration files instead. KUBELET_EXTRA_ARGS should be sourced from this file.
EnvironmentFile=-/etc/sysconfig/kubelet
ExecStart=
ExecStart=/usr/bin/kubelet $KUBELET_KUBECONFIG_ARGS $KUBELET_CONFIG_ARGS $KUBELET_KUBEADM_ARGS $KUBELET_EXTRA_ARGS --node-ip=182.160.14.196
显示默认的init初始化文件并打印出来存放到指定位置
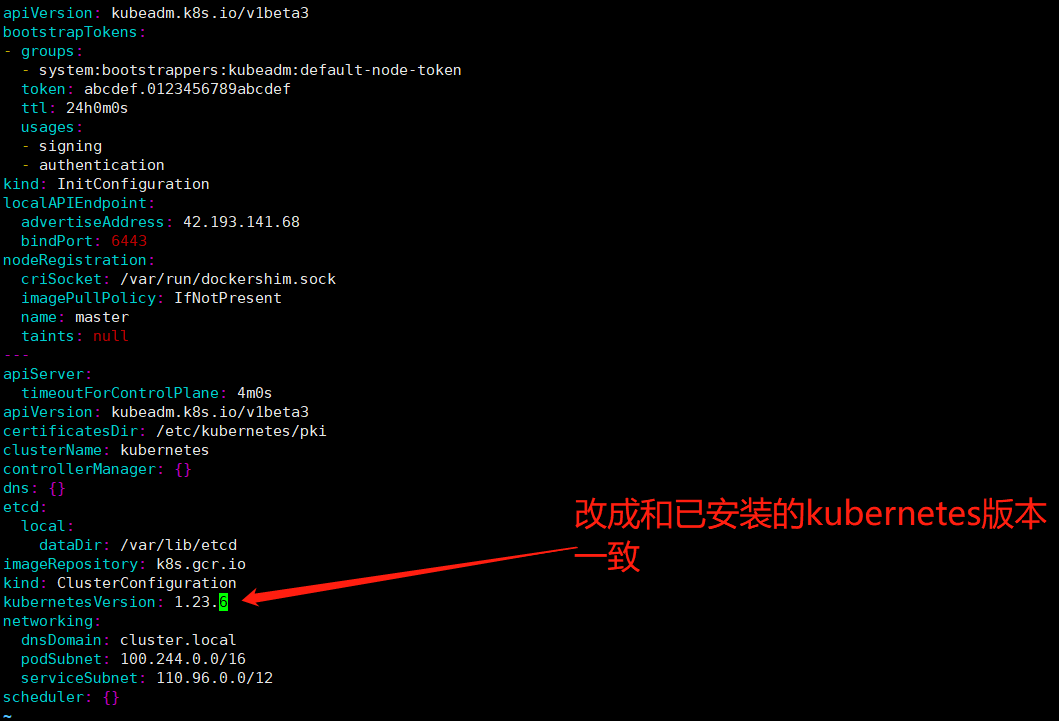
kubeadm config print init-defaults >kubeadm-config.yaml
# step1 添加配置文件,注意替换下面的IP
cat > kubeadm-config.yaml <<EOF
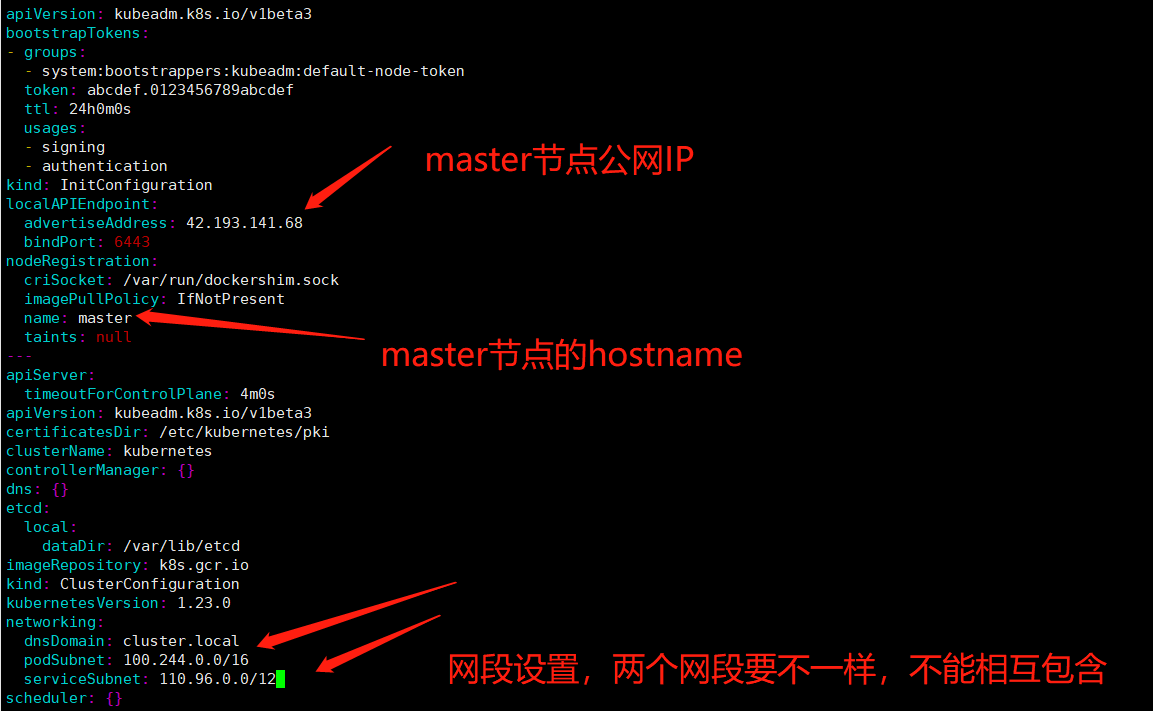
apiVersion: kubeadm.k8s.io/v1beta3
bootstrapTokens:
- groups:
- system:bootstrappers:kubeadm:default-node-token
token: abcdef.0123456789abcdef
ttl: 24h0m0s
usages:
- signing
- authentication
kind: InitConfiguration
localAPIEndpoint:
advertiseAddress: 182.160.14.196
bindPort: 6443
nodeRegistration:
criSocket: /var/run/dockershim.sock
imagePullPolicy: IfNotPresent
name: master
taints: null
---
apiServer:
timeoutForControlPlane: 4m0s
apiVersion: kubeadm.k8s.io/v1beta3
certificatesDir: /etc/kubernetes/pki
clusterName: kubernetes
controllerManager: {}
dns: {}
etcd:
local:
dataDir: /var/lib/etcd
imageRepository: k8s.gcr.io
kind: ClusterConfiguration
kubernetesVersion: 1.23.6
networking:
dnsDomain: cluster.local
podSubnet: 100.244.0.0/16
serviceSubnet: 110.96.0.0/12
scheduler: {}
EOF
#初始化 如果是1核心或者1G内存的请在末尾添加参数(--ignore-preflight-errors=all),否则会初始化失败
kubeadm init --config=kubeadm-config.yaml --ignore-preflight-errors=all --v=5
#上面初始化成功后,将会生成kubeconfig文件,用于请求api服务器,请执行下面操作
mkdir -p $HOME/.kube
sudo cp -i /etc/kubernetes/admin.conf $HOME/.kube/config
sudo chown $(id -u):$(id -g) $HOME/.kube/config
#node点加入主节点使用
kubeadm join 182.160.14.196:6443 --token abcdef.0123456789abcdef \
--discovery-token-ca-cert-hash sha256:dfe3d1706c8858bd77709d7063e7dd6e83976c9d76a625cd97da74df8f5d82a9
vim /etc/kubernetes/manifests/kube-apiserver.yaml
apiVersion: v1
kind: Pod
metadata:
  annotations:
    kubeadm.kubernetes.io/kube-apiserver.advertise-address.endpoint: 182.160.14.196:6443
  creationTimestamp: null
  labels:
    component: kube-apiserver
    tier: control-plane
  name: kube-apiserver
  namespace: kube-system
spec:
  containers:
  - command:
    - kube-apiserver
    - --advertise-address=182.160.14.196
    - --allow-privileged=true
    - --authorization-mode=Node,RBAC
    - --client-ca-file=/etc/kubernetes/pki/ca.crt

    - --cluster-cidr=100.244.0.0/16

    - --enable-admission-plugins=NodeRestriction
    - --enable-bootstrap-token-auth=true
    - --etcd-cafile=/etc/kubernetes/pki/etcd/ca.crt
    - --etcd-certfile=/etc/kubernetes/pki/apiserver-etcd-client.crt
    - --etcd-keyfile=/etc/kubernetes/pki/apiserver-etcd-client.key
    - --etcd-servers=https://127.0.0.1:2379
    - --kubelet-client-certificate=/etc/kubernetes/pki/apiserver-kubelet-client.crt
    - --kubelet-client-key=/etc/kubernetes/pki/apiserver-kubelet-client.key
    - --kubelet-preferred-address-types=InternalIP,ExternalIP,Hostname
    - --proxy-client-cert-file=/etc/kubernetes/pki/front-proxy-client.crt
    - --proxy-client-key-file=/etc/kubernetes/pki/front-proxy-client.key
    - --requestheader-allowed-names=front-proxy-client
    - --requestheader-client-ca-file=/etc/kubernetes/pki/front-proxy-ca.crt
    - --requestheader-extra-headers-prefix=X-Remote-Extra-
    - --requestheader-group-headers=X-Remote-Group
    - --requestheader-username-headers=X-Remote-User
    - --secure-port=6443
    - --service-account-issuer=https://kubernetes.default.svc.cluster.local
    - --service-account-key-file=/etc/kubernetes/pki/sa.pub
    - --service-account-signing-key-file=/etc/kubernetes/pki/sa.key
    - --service-cluster-ip-range=110.96.0.0/12
    - --tls-cert-file=/etc/kubernetes/pki/apiserver.crt
    - --tls-private-key-file=/etc/kubernetes/pki/apiserver.key
    image: k8s.gcr.io/kube-apiserver:v1.23.6
    imagePullPolicy: IfNotPresent
    livenessProbe:
      failureThreshold: 8
      httpGet:
        host: 182.160.14.196
        path: /livez
        port: 6443
        scheme: HTTPS
      initialDelaySeconds: 10
      periodSeconds: 10
      timeoutSeconds: 15
    name: kube-apiserver
    readinessProbe:
      failureThreshold: 3
      httpGet:
        host: 182.160.14.196
        path: /readyz
        port: 6443
        scheme: HTTPS
      periodSeconds: 1
      timeoutSeconds: 15
    resources:
      requests:
        cpu: 250m
    startupProbe:
      failureThreshold: 24
      httpGet:
        host: 182.160.14.196
        path: /livez
        port: 6443
        scheme: HTTPS
      initialDelaySeconds: 10
      periodSeconds: 10
      timeoutSeconds: 15
    volumeMounts:
    - mountPath: /etc/ssl/certs
      name: ca-certs
      readOnly: true
    - mountPath: /etc/pki
      name: etc-pki
      readOnly: true
    - mountPath: /etc/kubernetes/pki
      name: k8s-certs
      readOnly: true
  hostNetwork: true
  priorityClassName: system-node-critical
  securityContext:
    seccompProfile:
      type: RuntimeDefault
  volumes:
  - hostPath:
      path: /etc/ssl/certs
      type: DirectoryOrCreate
    name: ca-certs
  - hostPath:
      path: /etc/pki
      type: DirectoryOrCreate
    name: etc-pki
  - hostPath:
      path: /etc/kubernetes/pki
      type: DirectoryOrCreate
    name: k8s-certs
status: {}
kubeadm join 182.160.14.196:6443 --token kias9b.0sngusi94r8bh6f6 --discovery-token-ca-cert-hash sha256:09868a449efed1bb017d3a7b6e7fc3386feac6fcbc076350e5868ff1fc5be3f5

#master节点执行,看是否添加成功  ip地址等信息
kubectl get nodes -o wide

#默认token有效期为24小时,当过期之后,该token就不可用了。这时就需要重新创建token
kubeadm token create --print-join-command
#下载文件
wget https://raw.githubusercontent.com/coreos/flannel/master/Documentation/kube-flannel.yml
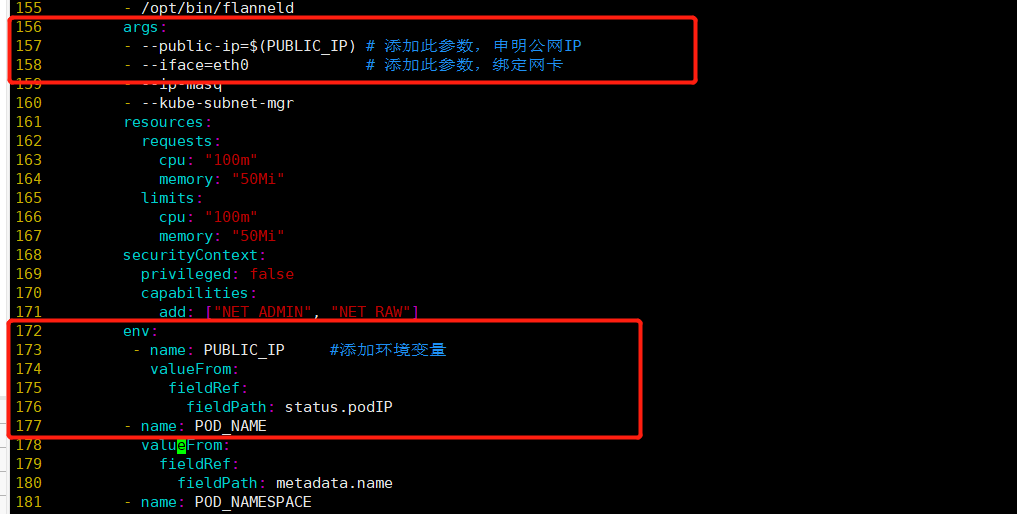
# 共修改两个地方,一个是args下,添加
 args:
 - --public-ip=$(PUBLIC_IP) # 添加此参数,申明公网IP
 - --iface=eth0             # 添加此参数,绑定网卡


 # 然后是env下
 env:
 - name: PUBLIC_IP     #添加环境变量
   valueFrom:
     fieldRef:
       fieldPath: status.podIP

# 还有 net-conf.json 的 Network,设置和 kubeadm-config.yaml 的 podSubnet 一致
---
kind: Namespace
apiVersion: v1
metadata:
  name: kube-flannel
  labels:
    pod-security.kubernetes.io/enforce: privileged
---
kind: ClusterRole
apiVersion: rbac.authorization.k8s.io/v1
metadata:
  name: flannel
rules:
- apiGroups:
  - ""
  resources:
  - pods
  verbs:
  - get
- apiGroups:
  - ""
  resources:
  - nodes
  verbs:
  - list
  - watch
- apiGroups:
  - ""
  resources:
  - nodes/status
  verbs:
  - patch
---
kind: ClusterRoleBinding
apiVersion: rbac.authorization.k8s.io/v1
metadata:
  name: flannel
roleRef:
  apiGroup: rbac.authorization.k8s.io
  kind: ClusterRole
  name: flannel
subjects:
- kind: ServiceAccount
  name: flannel
  namespace: kube-flannel
---
apiVersion: v1
kind: ServiceAccount
metadata:
  name: flannel
  namespace: kube-flannel
---
kind: ConfigMap
apiVersion: v1
metadata:
  name: kube-flannel-cfg
  namespace: kube-flannel
  labels:
    tier: node
    app: flannel
data:
  cni-conf.json: |
    {
      "name": "cbr0",
      "cniVersion": "0.3.1",
      "plugins": [
        {
          "type": "flannel",
          "delegate": {
            "hairpinMode": true,
            "isDefaultGateway": true
          }
        },
        {
          "type": "portmap",
          "capabilities": {
            "portMappings": true
          }
        }
      ]
    }
  net-conf.json: |
    {
      "Network": "100.244.0.0/16",
      "Backend": {
        "Type": "vxlan"
      }
    }
---
apiVersion: apps/v1
kind: DaemonSet
metadata:
  name: kube-flannel-ds
  namespace: kube-flannel
  labels:
    tier: node
    app: flannel
spec:
  selector:
    matchLabels:
      app: flannel
  template:
    metadata:
      labels:
        tier: node
        app: flannel
    spec:
      affinity:
        nodeAffinity:
          requiredDuringSchedulingIgnoredDuringExecution:
            nodeSelectorTerms:
            - matchExpressions:
              - key: kubernetes.io/os
                operator: In
                values:
                - linux
      hostNetwork: true
      priorityClassName: system-node-critical
      tolerations:
      - operator: Exists
        effect: NoSchedule
      serviceAccountName: flannel
      initContainers:
      - name: install-cni-plugin
       #image: flannelcni/flannel-cni-plugin:v1.1.0 for ppc64le and mips64le (dockerhub limitations may apply)
        image: docker.io/rancher/mirrored-flannelcni-flannel-cni-plugin:v1.1.0
        command:
        - cp
        args:
        - -f
        - /flannel
        - /opt/cni/bin/flannel
        volumeMounts:
        - name: cni-plugin
          mountPath: /opt/cni/bin
      - name: install-cni
       #image: flannelcni/flannel:v0.19.0 for ppc64le and mips64le (dockerhub limitations may apply)
        image: docker.io/rancher/mirrored-flannelcni-flannel:v0.19.0
        command:
        - cp
        args:
        - -f
        - /etc/kube-flannel/cni-conf.json
        - /etc/cni/net.d/10-flannel.conflist
        volumeMounts:
        - name: cni
          mountPath: /etc/cni/net.d
        - name: flannel-cfg
          mountPath: /etc/kube-flannel/
      containers:
      - name: kube-flannel
       #image: flannelcni/flannel:v0.19.0 for ppc64le and mips64le (dockerhub limitations may apply)
        image: docker.io/rancher/mirrored-flannelcni-flannel:v0.19.0
        command:
        - /opt/bin/flanneld
        args:
        - --public-ip=$(PUBLIC_IP) # 添加此参数,申明公网IP
        - --iface=eth0             # 添加此参数,绑定网卡
        - --ip-masq
        - --kube-subnet-mgr
        resources:
          requests:
            cpu: "100m"
            memory: "50Mi"
          limits:
            cpu: "100m"
            memory: "50Mi"
        securityContext:
          privileged: false
          capabilities:
            add: ["NET_ADMIN", "NET_RAW"]
        env:
        - name: PUBLIC_IP
          valueFrom:
            fieldRef:
              fieldPath: status.podIP
        - name: POD_NAME
          valueFrom:
            fieldRef:
              fieldPath: metadata.name
        - name: POD_NAMESPACE
          valueFrom:
            fieldRef:
              fieldPath: metadata.namespace
        - name: EVENT_QUEUE_DEPTH
          value: "5000"
        volumeMounts:
        - name: run
          mountPath: /run/flannel
        - name: flannel-cfg
          mountPath: /etc/kube-flannel/
        - name: xtables-lock
          mountPath: /run/xtables.lock
      volumes:
      - name: run
        hostPath:
          path: /run/flannel
      - name: cni-plugin
        hostPath:
          path: /opt/cni/bin
      - name: cni
        hostPath:
          path: /etc/cni/net.d
      - name: flannel-cfg
        configMap:
          name: kube-flannel-cfg
      - name: xtables-lock
        hostPath:
          path: /run/xtables.lock
          type: FileOrCreate

FLANNELNETWORK 就是 flannel 在启动时候设置的 POD 的集群网段,类似1.1.0.0/16,FLANNELSUBNET 则是所在 Node 节点的 Subnet 段,比如1.1.1.0/24,FLANNELNETWORK 网段要包含 FLANNELSUBNET。同时kubeadm-config.yaml 的 podSubnet 网段要包含 FLANNELNETWORK 网段。
特别注意!!!!每个节点的FLANNELSUBNET 都要不一样,但是都要在FLANNELNETWORK网段下面!!!_
mkdir /run/flannel
touch /run/flannel/subnet.env
cat > /run/flannel/subnet.env <<EOF
FLANNEL_NETWORK=100.244.0.0/16
FLANNEL_SUBNET=100.244.1.0/24
FLANNEL_MTU=1450
FLANNEL_IPMASQ=true
EOF
#创建flannel
kubectl apply -f kube-flannel.yml

#检查pod是否都已经在running状态
kubectl get pods -o wide --all-namespaces
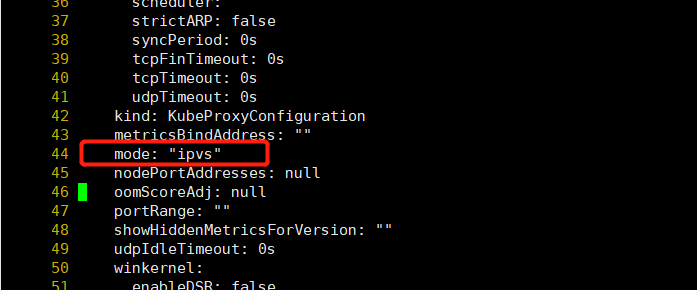
kubectl edit configmaps -n kube-system kube-proxy

# Please edit the object below. Lines beginning with a '#' will be ignored,
# and an empty file will abort the edit. If an error occurs while saving this file will be
# reopened with the relevant failures.
#
apiVersion: v1
data:
  config.conf: |-
    apiVersion: kubeproxy.config.k8s.io/v1alpha1
    bindAddress: 0.0.0.0
    bindAddressHardFail: false
    clientConnection:
      acceptContentTypes: ""
      burst: 0
      contentType: ""
      kubeconfig: /var/lib/kube-proxy/kubeconfig.conf
      qps: 0
    clusterCIDR: 100.244.0.0/16
    configSyncPeriod: 0s
    conntrack:
      maxPerCore: null
      min: null
      tcpCloseWaitTimeout: null
      tcpEstablishedTimeout: null
    detectLocalMode: ""
    enableProfiling: false
    healthzBindAddress: ""
    hostnameOverride: ""
    iptables:
      masqueradeAll: false
      masqueradeBit: null
      minSyncPeriod: 0s
      syncPeriod: 0s
    ipvs:
      excludeCIDRs: null
      minSyncPeriod: 0s
      scheduler: ""
      strictARP: false
      syncPeriod: 0s
      tcpFinTimeout: 0s
      tcpTimeout: 0s
      udpTimeout: 0s
    kind: KubeProxyConfiguration
    metricsBindAddress: ""
    mode: "ipvs"
    nodePortAddresses: null
    oomScoreAdj: null
    portRange: ""
    showHiddenMetricsForVersion: ""
    udpIdleTimeout: 0s
    winkernel:
      enableDSR: false
      networkName: ""
      sourceVip: ""
  kubeconfig.conf: |-
    apiVersion: v1
....
首先停用网络,然后删除配置
ifconfig cni0 down
ip link delete cni0

#需要把原来的两个dns的pod删掉,让它重建获取IP
kubectl delete pod coredns-64897985d-bjjc8 -n kube-system
kubectl delete pod coredns-64897985d-dwkwn -n kube-system
然后查看节点重建的cni0网卡,会依据flannel的网络环境配置生成